The Azure MCP (Model Context Protocol) Server acts as a bridge, allowing AI agents to interact directly with Azure infrastructure using natural language. Instead of struggling with complex CLI syntax to query Azure Kubernetes Service (AKS), you can simply “ask” the MCP server to retrieve cluster configurations, list node pools, or check network settings. It simplifies the “how-do-I-do-this” hurdle, allowing you to focus on managing your container workloads through plain English prompts rather than memorizing documentation.
From “Fire in the Datacenter” to “Fixed While You Sleep”
We’ve all been there. It’s 3:00 AM. Your phone buzzes with a high-priority alert. You drag yourself out of bed, fumble for your laptop, and try to remember where you left your sanity.
What if your AI agent—your digital on-call engineer—could handle it instead?
By combining Dynatrace (for observability), Azure MCP (for infrastructure control), and Jira (for tracking), you can move from reactive “firefighting” to autonomous “self-healing.”
The “Auto-Fix” Architecture
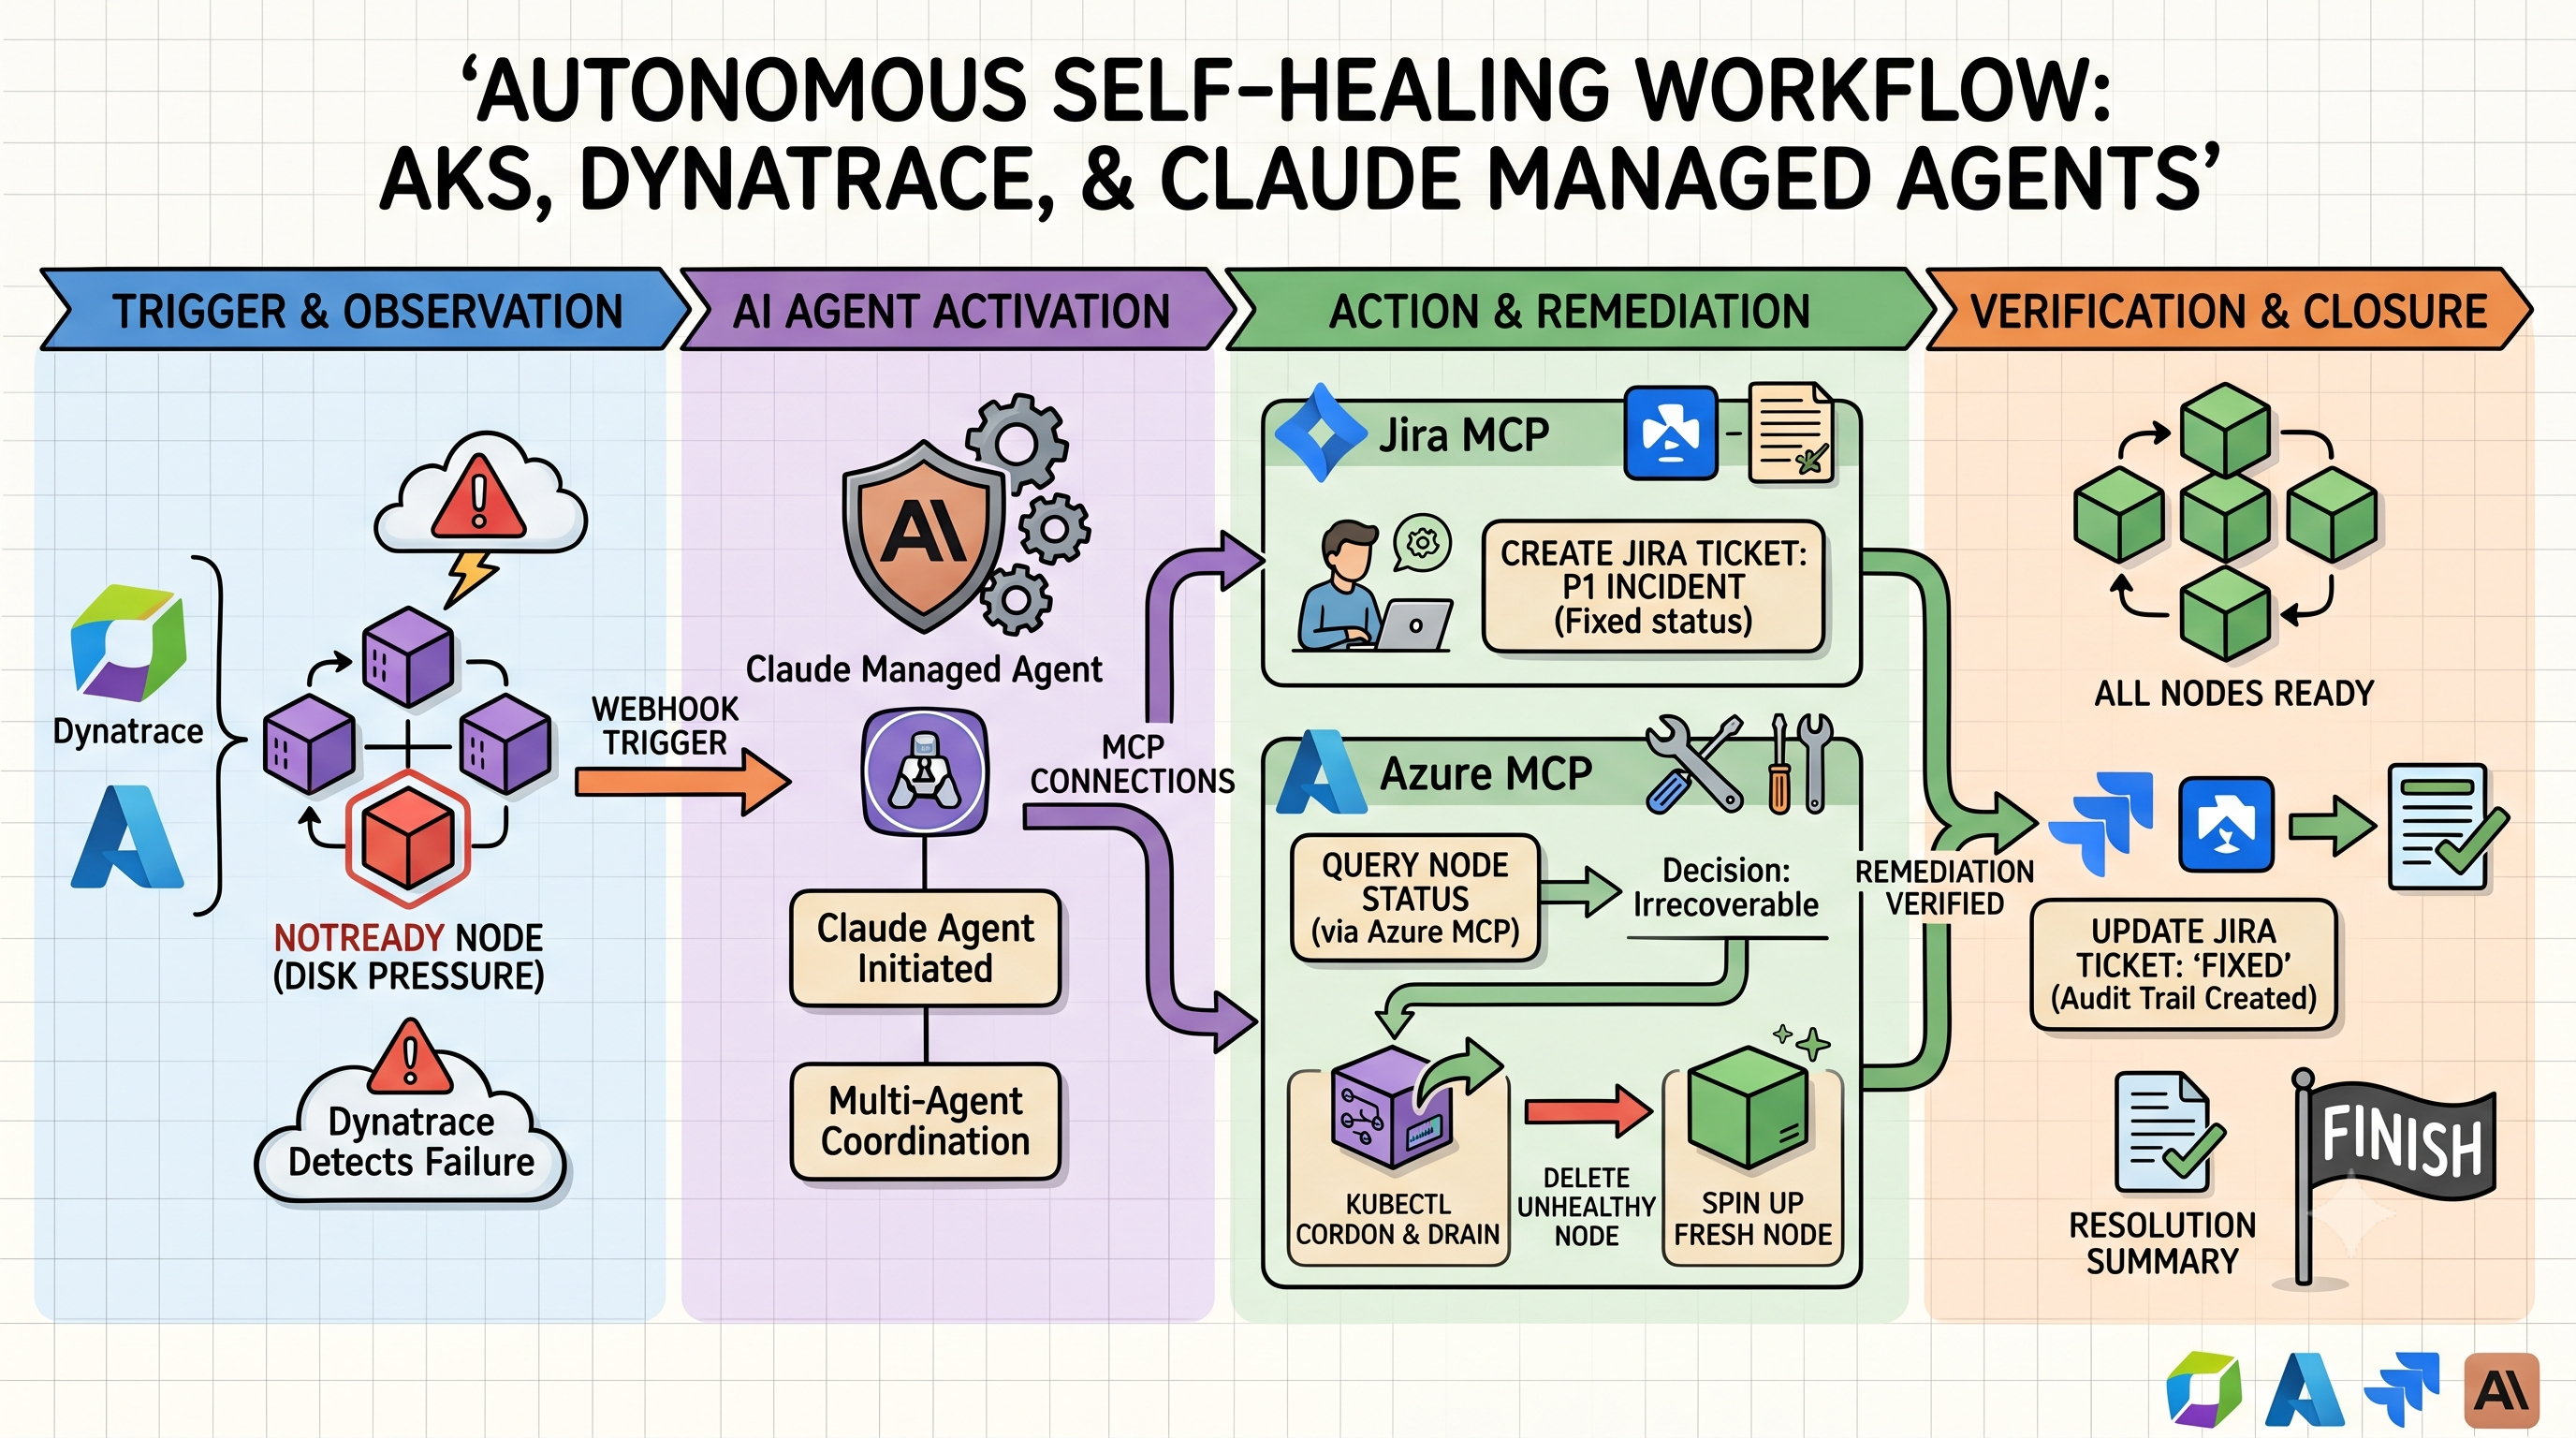
When an “Unhealthy Node” alert fires in AKS, you don’t need to wake up. Here is the workflow:
The Trigger: Dynatrace detects a node in your AKS cluster is reporting NotReady due to disk pressure.
The Agent Wakes Up: A webhook triggers your Claude Managed Agent.
The Documentation: The agent uses the Jira MCP to automatically create a “P1 Incident” ticket, attaching the Dynatrace diagnostic logs.
The Investigation & Action: * The agent uses the Azure MCP to query the specific node pool status.
It determines the node is irrecoverable.
It issues a kubectl cordon and drain command (via the Azure MCP) to safely move workloads.
It deletes the unhealthy node and forces the scale set to spin up a fresh, healthy one.
The Wrap-Up: The agent confirms the node is Ready, adds a comment to the Jira ticket with the “Fixed” status, and moves it to the “Done” column.
Why this is a game-changer
It isn’t just about speed; it’s about consistency. Humans get tired, stressed, and prone to “copy-paste” errors at 3 AM. An AI agent follows a predefined rubric. If the first attempt to drain the node fails, it doesn’t panic—it reads the error code, adjusts the strategy, and tries again.
And because you have the Jira MCP hooked into the loop, you always have an audit trail. You can wake up at 8 AM, have your coffee, and read a neat summary of exactly what the agent did while you were dreaming about a vacation from on-call duty.
The future isn’t just “no ops.” It’s “AI-ops.” You define the boundaries, you define the rules, and the agent keeps the ship running while you get some actual sleep.
As organizations increasingly adopt cloud computing, they require a robust framework to guide their cloud journey effectively. Microsoft Azure offers the Cloud Adoption Framework (CAF), a proven methodology to accelerate cloud adoption and provide organizations with a structured approach. Building upon the CAF, Microsoft has introduced the Azure CAF Super Module, enhancing the framework’s capabilities. In this blog post, we will delve into the CAF Super Module, with a particular focus on the CAF Enterprise Module, and discuss the advantages and disadvantages of leveraging this powerful tool.
Understanding the Azure CAF Super Module
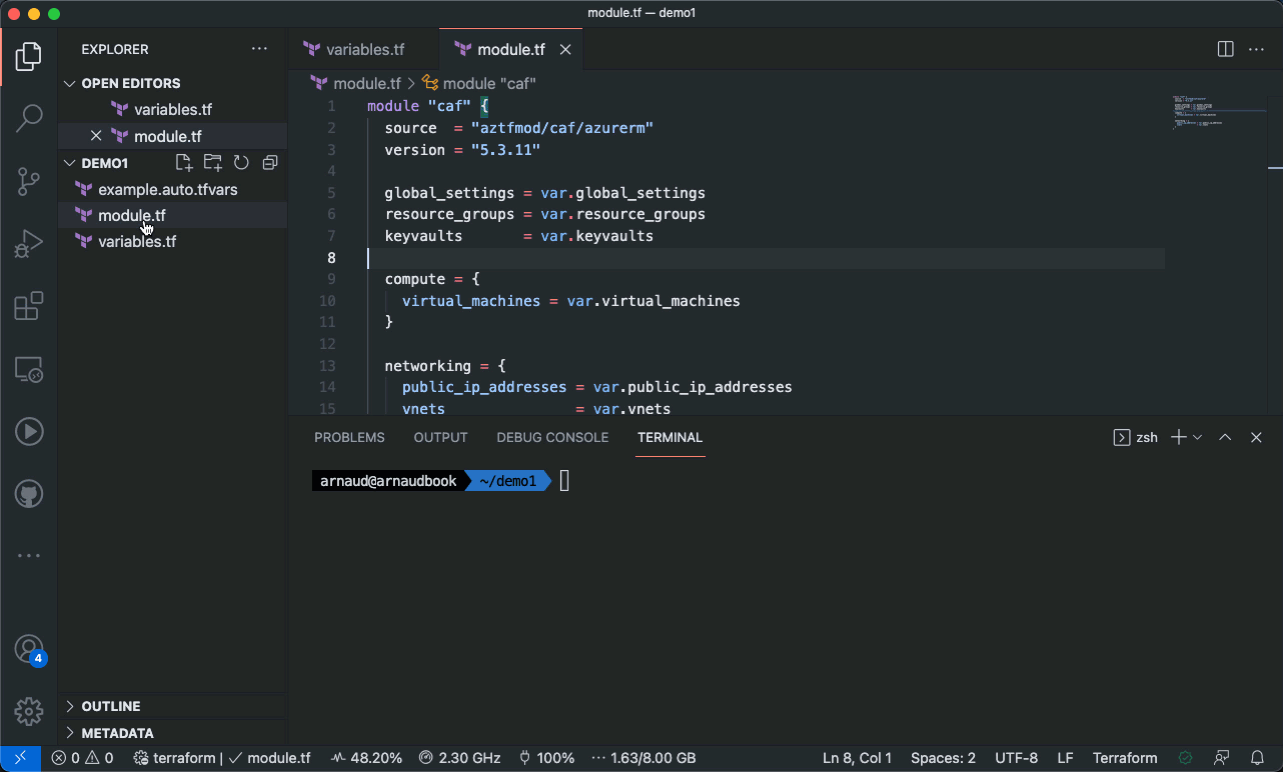
“We want to promote “infrastructure-as-data” in favor of ad-hoc “infrastructure-as-code”, in order to make composition more accessible and rely on a strong community to write code.”
The Azure CAF Super Module is an extension of the Cloud Adoption Framework, tailored specifically for Azure. It serves as a comprehensive guide to help organizations develop their cloud strategy, plan migrations, establish governance controls, and optimize their cloud environments. By adopting the Super Module, organizations can align their cloud initiatives with Azure best practices, ensuring a secure, scalable, and efficient cloud adoption journey.
The CAF Enterprise Module
At the core of the Azure CAF Super Module lies the CAF Enterprise Module, a key component designed to provide organizations with a standardized approach to building and operating their cloud environments. The CAF Enterprise Module encompasses several crucial elements, including governance, operations, and security, enabling organizations to effectively manage and maintain their Azure deployments.
Governance: The CAF Enterprise Module offers a set of governance principles, guidelines, and best practices that facilitate the implementation of effective governance controls. It helps organizations define roles and responsibilities, establish policies, and ensure compliance and security in their Azure environments. The module assists in creating a well-structured governance framework, enabling organizations to balance control and agility.
Operations: With the CAF Enterprise Module, organizations can implement standardized operational practices for managing their Azure environments. It provides guidance on monitoring, management, and incident response, helping organizations ensure the reliability, availability, and performance of their cloud resources. The module also assists in automating operational tasks, optimizing costs, and maintaining service continuity.
Security: Security is a critical aspect of any cloud deployment, and the CAF Enterprise Module emphasizes this by offering comprehensive security guidance. It provides organizations with a structured approach to defining security policies, implementing security controls, and managing identity and access. The module also focuses on threat protection, data protection, and compliance, enabling organizations to build secure and compliant Azure environments.
Advantages of the CAF Super Module
Standardization: The Azure CAF Super Module promotes standardization by providing a well-defined framework for cloud adoption. It ensures that organizations follow best practices and establish consistent processes and policies, resulting in improved efficiency and reduced complexity.
Accelerated adoption: The CAF Super Module accelerates cloud adoption by offering a clear roadmap and guidance. It helps organizations avoid common pitfalls and make informed decisions throughout their cloud journey, ultimately saving time and effort.
Enhanced governance: The CAF Enterprise Module enhances governance capabilities by providing a structured approach to establish and enforce governance controls. It ensures compliance, mitigates risks, and promotes accountability, giving organizations greater control over their Azure environments.
Improved security and compliance: With the CAF Super Module, organizations can strengthen their security posture and achieve compliance objectives. The module offers comprehensive security guidance, enabling organizations to implement robust security controls and protect their data and resources effectively.
Disadvantages of the CAF Super Module
Complexity: While the CAF Super Module offers a comprehensive framework, its implementation can be complex for organizations with limited cloud expertise. Organizations may need to invest in training and additional resources to fully leverage the capabilities of the Super Module.
Customization challenges: The CAF Super Module provides a standardized
approach, which may not align perfectly with every organization’s unique requirements. Adapting the Super Module to specific needs may involve additional customization efforts and careful consideration of individual business objectives.
Remediation of legacy assets is not really accounted for and probably requires a seprate git repo for retro fixing due to legacy resources not having a naming convention to begin with
Conclusion
The Azure CAF Super Module, with its powerful CAF Enterprise Module, provides organizations with a robust framework for accelerating their cloud adoption journey on the Azure platform. By leveraging the CAF Super Module, organizations can benefit from standardized practices, enhanced governance, improved security, and accelerated cloud adoption. However, it is essential to acknowledge the potential complexities and customization challenges that organizations may encounter while implementing the Super Module. Overall, the Azure CAF Super Module offers a valuable toolset for organizations seeking to maximize the benefits of Azure and achieve successful cloud transformations.
What if I told you that you could access your Azure Cloud Resources and tick the following boxes:
More secure than a VPN
More secure than a Bastion Host and Jumpbox
No need for patching and SOC2 compliance reports
If your cloud environment is serverless, why settle for less when it comes to remote access?
As soon as you introduce a jump box, you are required to patch the damn thing and this eats into the Opex budget in a big way.
So what is the solution?
What if you had a docker image with all the tools you need for support that you can spin up into an Azure Container Instance and access on demand, with the filesystem running off Azure Blob Storage?
Well, this is possible, and the good news is that you do not need to build it yourself. Microsoft already offers it.
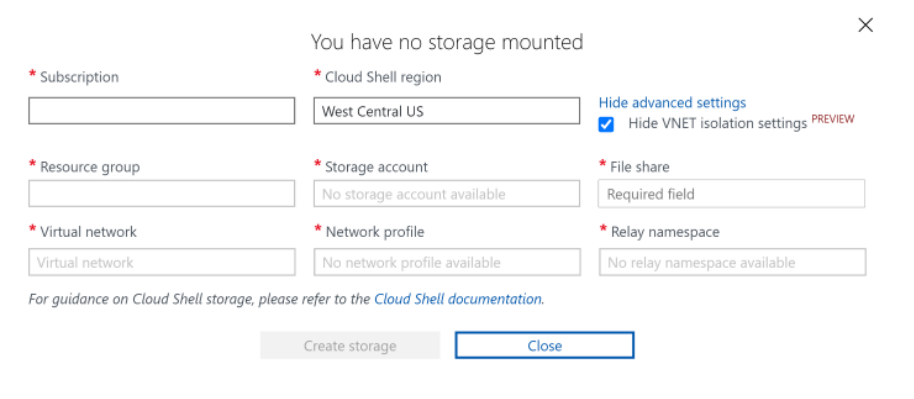
Welcome to Azure Cloud Shell with VNET Integration!
Cloud Shell with VNET integration leveraging subnet delegation for ACI
The only limitation is that the Storage Account only supports Primary Regions, however Microsoft notified me today that Australia East is now supported.
Microsoft is currently working on more secondary region support, just something to be aware of from a security/data sovereignty perspective.
So the experience is like this.
Log into the Azure Portal
Choose Cloud Shell with advanced options – Select VNET Integration and select the subnet / storage account that we will terraform
Boom – You are in the Azure network and Cloud Shell will have all your common support tools that your require.
Terraform
We will need:
Dedicated subnet for CloudShell ACI instances to spin up in.
"csh" = "10.1.12.0/26"
Dedicated support subnet for storage account
"sup" = "10.1.13.0/26"
A dedicate subnet for the Azure Relay
relay_subnet = "10.1.14.0/26"

# Container instance built in OID for permissions / delegation
# Manually grant in Azure AD
container_instance_oid = "4c1b7058-e8ea-4854-abd2-bbb0abb6cd24"
Storage Account for OS filesystem – network rules for Cloudshell
After investigating an issue with Azure Streamiung Analytics, we discovered it cannot deserialise JSON that have the same property names but differ in case e.g.
{
  "Proxy": "abc",
  "proxy": "def"
}
If you send the above payload to a Streaming Analytics Job, it will fail.
Source ‘<unknown_location>’ had 1 occurrences of kind ‘InputDeserializerError.InvalidData’ between processing times ‘2020-03-30T00:19:27.8689879Z’ and ‘2020-03-30T00:19:27.8689879Z’. Could not deserialize the input event(s) from resource ‘Partition: [8], Offset: [1], SequenceNumber: [1]’ as Json. Some possible reasons: 1) Malformed events 2) Input source configured with incorrect serialization format
We opened a ticket with Microsoft. This was the response.
“Hi Romiko,
Thank you for being patience with us. I had further discussion with our ASA PG and here’s our findings.
Findings
ASA unfortunately does not support case sensitive column. We understand it is possible for json documents to add to have two columns that differ only in case and that some libraries support it. However there hasn’t been a compelling use case to support it. We will update the documentation as well.
We are sorry for the inconvenience. If you have any questions or concerns, please feel free to reach out to me. I will be happy to assist you.”
Indeed other libraries do support this, such as powershell, c#, python etc.
A significant reason why Microsoft should support it – is the Elastic Common Schema. (ECS), a new specification that provides a consistent and customizable way to structure your data in Elasticsearch, facilitating the analysis of data from diverse sources. With ECS, analytics content such as dashboards and machine learning jobs can be applied more broadly, searches can be crafted more narrowly, and field names are easier to remember.
When introducing a new schema, there is always dealing with existing/custom data. Elastic have an ingenious way to solve this. All fields in ECS are lower case. So your existing data can be guarnteed to not conflict if you use an UpperCase.
This post will demonstrate how to deploy a AKS cluster using Advanced Networking. We will then deploy an Application Gateway Ingress Controller. Essentially this will install a dedicated ingress POD that fully manages the Application gateway.
This means all entries in the Application gateway are 100% managed by AKS. If you manually add an entry to the AG, it will be removed by AKS Ingress Controller.
Overview
Considerations
Decided to dedicate an entire /16 IP range to the AKS cluster for simplicity e.g. 10.69.0.0/16.
CNI provided the use of Application Gateway with WAFv2.
SSL offloading is configured. The actual private key (PEM – Base64 encoded) is stored in the default namespace in AKS. Whenever you deploy a new application, just –export (Deprecated) the key to the new namespace. The AG Ingress Controller will automatically be configured with the SSL certificate.
We will apply RBAC rules so AKS can manage the application gateway and VMSS scaleset.
RBAC to access container registry.
By using an Application Gateway, we can leverage additional benefits such as Web Application Firewall (V2), OWASP 3.0 firewall detection/prevention rules. Microsoft have totally refactors the AG WAF2 technology stack. It is much faster to provision and can deal with much larger amounts of traffic now.
By combining Load Balancing with WAF, we get the best of both worlds. If you have heavy traffic, it might be good to first do a performance test before making a final decision on AG + AKS stack.
Environment Setup + Tools
We are using AKS VMSS preview feature. Azure Virtual Machine Scale Sets have been around for a long time, and are in fact used by Microsoft Service Fabric. It makes total sense that this auto-scaling architecture is leveraged by AKS.
Due to the preview status of Container Services and VMSS+AKS, we will choose Azure CLI.
You can use Ubuntu Windows Shell or a Linux Ubuntu Shell.
Run the following code to setup your bash environment.
Helm is a client side tool to provide configuration settings to AKS. Tiller is a server side setting that runs on AKS that applies configuration settings that are applied from a helm client.
Create a config folder with 2 files.
Replace THECERTIFICATECHAIN with the contents of your base64 encoded .cer certificate chain. The script will replace <THEPRIVATEKEY> when you paste your private key. Future namespace or apps, will be able to find this in the default namespace. Thus a 1 time operations
e.g. (kubectl get secret rangerrom-tls –namespace=default ….).
Ensure you have * VNET in a resounce group – ${env}-network-rg * Subnet with a name ${env}-aks-cluster-subnet matching the IP rules
Install AKS into existing VNET
#!/bin/bash
aksversion='1.13.7'
while ! [[ "$env" =~ ^(sb|dv|ut|pd)$ ]]
do
  echo "Please specifiy environment [sb, dv,ut,pd]?"
  read -r env
done

case $env in

  dv)
    servicecidr="10.66.64.0/18"
    dnsserver="10.66.64.10"
    az account set --subscription 'RangerRom DEV'
    subscriptionid=$(az account show --subscription 'RangerRom DEV' --query id | sed  's/\"//g')
    ;;

  sb)
    servicecidr="10.69.64.0/18"
    dnsserver="10.69.64.10"
    az account set --subscription 'RangerRom SANDBOX'
    subscriptionid=$(az account show --subscription 'RangerRom SANDBOX' --query id | sed  's/\"//g')
    ;;

  ut)
    servicecidr="10.70.64.0/18"
    dnsserver="10.70.64.10"
    az account set --subscription 'RangerRom TEST'
    subscriptionid=$(az account show --subscription 'RangerRom TEST' --query id | sed  's/\"//g')
    ;;

  pd)
    servicecidr="10.68.64.0/18"
    dnsserver="10.68.64.10"
    az account set --subscription 'RangerRom PROD'
    subscriptionid=$(az account show --subscription 'RangerRom PROD' --query id | sed  's/\"//g')
    ;;
  *)
    echo "environment not found"
    exit
    ;;
esac

env="rrau${env}"
location="australiaeast"

az group create --location $location --name "${env}-aks-rg"
sleep 5

az feature register -n VMSSPreview --namespace Microsoft.ContainerService
az provider register -n Microsoft.ContainerService

az aks create \
    --resource-group "${env}-aks-rg" \
    --name "${env}-aks-cluster" \
    --enable-vmss \
    --node-count 2 \
    --kubernetes-version $aksversion \
    --generate-ssh-keys \
    --network-plugin azure \
    --service-cidr $servicecidr \
    --dns-service-ip $dnsserver \
    --vnet-subnet-id "/subscriptions/${subscriptionid}/resourceGroups/${env}-network-rg/providers/Microsoft.Network/virtualNetworks/${env}-network/subnets/${env}-aks-cluster-subnet"


clusterprincipalid=$(az ad sp list --display-name ${env}-aks-cluster --query [0].objectId)
resourceGroupid=$(az group show --name ${env}-network-rg --query 'id')
echo "Configuring cluster to owner ${resourceGroupid}"
cmd="az role assignment create --role Contributor --assignee $clusterprincipalid --scope $resourceGroupid"
eval $cmd


echo "Configuring AKS Cluster with Tiller"
az aks get-credentials --resource-group "${env}-aks-rg" --name "${env}-aks-cluster" --overwrite-existing
kubectl apply -f ./config/tiller-rbac.yml
helm init --service-account tiller

while ! [[ ${#privatekey} -gt 2000 ]]
do
  echo "Please provide TLS Private Key - BASE64 Encoded PEM?"
  read -r privatekey
done

kubectl create namespace scpi-${env}
cat ./config/rangerrom-tls.yml  | sed "s/THEPRIVATEKEY/$privatekey/" > temptls.yml
kubectl apply -f temptls.yml -n default
#The Flag --export is going to be deprecated - Below is workaround.
kubectl get secret rangerrom-tls --namespace=default -o yaml | \
   sed '/^.*creationTimestamp:/d' |\
   sed '/^.*namespace:/d' |\
   sed '/^.*resourceVersion:/d' |\
   sed '/^.*selfLink:/d' |\
   sed '/^.*uid:/d' |\
   kubectl apply --namespace=scpi-${env} -f -

rm -f ./temptls.yml
privatekey=""

echo "Setup container registry permissions"
az acr create -n "${env}containerregistry" -g "${env}-common-rg" --sku Premium
containerid=$(az acr show -n ${env}containerregistry --query id)
principalidaks=$(az ad sp list --all --query "([?contains(to_string(displayName),'"${env}-aks-cluster"')].objectId)[0]")
cmd1="az role assignment create --role acrpull --assignee $principalidaks --scope $containerid"
eval $cmd1

echo "Setup container registry permissions - Centralised"
containerid=$(az acr show --subscription 'RangerRom PROD' -n rraupdcontainerregistry --query id)
cmd2="az role assignment create --role acrpull --assignee $principalidaks --scope $containerid"
eval $cmd2
Install and Configure AKS to control the Ingress
#!/bin/bash
while ! [[ "$env" =~ ^(sb|dv|ut|pd)$ ]]
do
  echo "Ensure you have owner permissions on the subscription before you continue."
  echo "Please specifiy environment [sb, dv,ut,pd]?"
  read -r env
done

case $env in

  dv)
    az account set --subscription 'RangerRom DEV'
    ;;

  sb)
    az account set --subscription 'RangerRom SANDBOX'
    ;;

  ut)
    az account set --subscription 'RangerRom TEST'
    ;;

  pd)
    az account set --subscription 'RangerRom PROD'
    ;;
  *)
    echo "Invalid Environment"
    exit
    ;;
esac

env="rrau${env}"

ipAddressName="${env}-aks-application-gateway-ip"
resourcegroup="MC_${env}-aks-rg_${env}-aks-cluster_australiaeast"
gatewayname="${env}-aks-application-gateway"
location="australiaeast"
vnet="${env}-network"
subnet="${env}-aks-application-gateway-subnet"

az network public-ip create \
  --resource-group $resourcegroup \
  --name $ipAddressName \
  --allocation-method Static \
  --sku Standard

sleep 20

subnetid=$(az network vnet subnet show -g "${env}-network-rg" -n "${env}-aks-application-gateway-subnet" --vnet-name ${vnet} --query id)
cmd="az network application-gateway create --name $gatewayname \
                                      --resource-group $resourcegroup \
                                      --capacity 2  \
                                      --sku "WAF_v2" \
                                      --subnet $subnetid \
                                      --http-settings-cookie-based-affinity Disabled \
                                      --location $location \
                                      --frontend-port 80 \
                                      --public-ip-address $ipAddressName"
eval $cmd
az network application-gateway waf-config set -g $resourcegroup --gateway-name $gatewayname \
                            --enabled true --firewall-mode Detection --rule-set-version 3.0

#Setup AAD POD Identity to manage application gateway
az identity create -g $resourcegroup -n "${env}-aks-aad_pod_identity"
sleep 20

principalid=$(az identity show -g $resourcegroup -n "${env}-aks-aad_pod_identity" --query 'principalId')
appgatewayid=$(az network application-gateway show -g $resourcegroup -n $gatewayname --query 'id')

echo "Assign Role so AKS can manage the Application Gateway"

echo "Configuring Create Role for identity - $principalid - for gateway"
cmd="az role assignment create --role Contributor --assignee $principalid --scope $appgatewayid"
eval $cmd

resourceGroupid=$(az group show --name $resourcegroup --query 'id')

echo "Configuring Read Role for identity - $principalid - for gateway resourcegroup"
cmd="az role assignment create --role Reader --assignee $principalid --scope $resourceGroupid"
eval $cmd

az identity show -g $resourcegroup -n "${env}-aks-aad_pod_identity"
echo "Please use the azure identity details above to configure AKS via Help for the AG Ingress Controller"
echo "Careful with copy and paste. Hidden characters can affect the values!"


echo "Ingress Controller for Azure Application Gateway"
az aks get-credentials --resource-group "${env}-aks-rg" --name "${env}-aks-cluster"
kubectl create -f https://raw.githubusercontent.com/Azure/aad-pod-identity/master/deploy/infra/deployment-rbac.yaml
helm repo add application-gateway-kubernetes-ingress https://appgwingress.blob.core.windows.net/ingress-azure-helm-package/
helm repo update

subscriptionid=$(az account show --query id | sed  's/\"//g')
appGatewayResourceId=$(az network application-gateway show -g $resourcegroup -n $gatewayname --query resourceGroup  | sed  's/\"//g')
identityClientid=$(az identity show -g $resourcegroup -n "${env}-aks-aad_pod_identity" --query clientId  | sed  's/\"//g')
aksfqdn=$(az aks show --resource-group "${env}-aks-rg" --name "${env}-aks-cluster" --query fqdn  | sed  's/\"//g')

cmd="helm upgrade ingress-azure application-gateway-kubernetes-ingress/ingress-azure \
     --install \
     --namespace default \
     --debug \
     --set appgw.name=$gatewayname \
     --set appgw.resourceGroup=$appGatewayResourceId \
     --set appgw.subscriptionId=$subscriptionid \
     --set appgw.shared=false \
     --set armAuth.type=aadPodIdentity \
     --set armAuth.identityResourceID=/subscriptions/$subscriptionid/resourcegroups/$appGatewayResourceId/providers/Microsoft.ManagedIdentity/userAssignedIdentities/$env-aks-aad_pod_identity \
     --set armAuth.identityClientID=$identityClientid \
     --set rbac.enabled=true \
     --set verbosityLevel=3 \
     --set aksClusterConfiguration.apiServerAddress=$aksfqdn"
eval $cmd
kubectl get pods
Conclusion
This post should provide a guide post to setup your infrastructure as code. By leveraging a rock solid naming convention, you can leverage fully automated scripts to deploy your environments. The above scripts for AKS and AG are also idempotent, so they can be run on a scheduled basis e.g. Azure Devops.
Leveraging the cerebrata cmdlets for Azure, we can easily backup our blob containers via snapshot, this will prove useful for Page Blobs that are Random Access i.e. VHD’s on Cloud Drive
I needed to update the transformation today to support different csdef files for UAT/Test etc. I found myself forgetting the process, so i thought it would be a good idea to log the entries needed.
What I wanted was a way to disable New Relic in our performance environment, since we do not have a license key.
Since we use the Azure Tasks to run batch jobs before the worker role starts, it made sense that I create a TASK Environment variable that my batch script can check and see if it should install New relic, e.g.
if "%MYSTORYENV%" == "PERF" goto :EOF
So, in the above, my batch file startup.cmd will skip installing new relic if the environment variable is PERF. However we need to set this value in the csdef file.
So we go to the BASE servicedefinition.csdef file and have this entry for it.
Notice I have the include at the bottom, so I can see these in Visual Studio. I also have transformations for cscfg files, hence the reason why you see them here
Imagine you need to boot up a web role in the cloud, but before the global.asax events kick in or even lower, before the WebRoleEntryPoint events kick in, you need to do some installations of prerequisite software.
The best way to go about doing this is to register a task in the ServiceDefinition.csdef file. Lets imagine we need to run a batch file that will do some sort of installation, say a monitoring service that is required to be installed BEFORE IIS starts our web application, so that it can get a hook point, say New Relic!
Below is a configuration example that will do this for you.
A nice tool to use to see which Azure Affinity Group to use e.g. South America, North America or Asia is to download this tool and run checks from where your clients will be based.
Once you got it installed, add your storage accounts and then get started.
So above we will test from Sydney Australia to our UAT environment in America.
Lets click “run”
It will start executing the test, this is now a good time to plan a date, make a cup of coffee or write some JScript for your open source projects.
Results:
Sydney to North America
Sydney to South East Asia (Singapore)
Conclusion
For us, South East Asia was far more better (Web site, download is more important than upload), and the proof was in the pudding when we measures web site response times with MVC MiniProfiler.
However, this is not the ultimate conclusion, I bet these response times will vary depending on time of day, perhaps when Asia is awake and US is asleep, it could be the other way round, so test it at different times of day and pick the affinity or region that is best for you!


You must be logged in to post a comment.