Category: AWS

Installing Puppet Enterprise on CentOS 7 in AWS EC2 with custom public HostName

Hey,

I ran into a few issues when I wanted to install Puppet Enterprise 2-17 in AWS as an EC2 instance. The main issues were

Summary

  • Need to use hostnamectl and cloud.cfg to change my hostname, as I wanted puppet on a public address, not private address, just for a POC
  • I was using a t2.nano and t2.micro, which will not work with Puppet Enterprise 2017 (puppet-enterprise-2017.2.2-el-7-x86_64). The error you get is just Failed to run PE Installer…… So I used a t2.medium to get around the issue.
  • The usual /etc/hosts file needs some settings and DNS registration (Route53 for me)
  • Disabled SELinux (We usually use a VPN)
  • Configure security groups and have 4433 as backup port (Probably not needed)

Preliminary Install Tasks

  1. Get the latest image from CentOS 7 (x86_64) – with Updates HVM
  2. Spin up an instance with at least 4GB memory, I had a lot of installation issues with applying the catalog with low memory. T2.Medium should work. Bigger is better!
    [puppet.rangerrom.com] Failed to run PE installer on puppet.rangerrom.com.
  3. If you not using a VPN then ensure you setup an elastic IP mapped to the instance for the public DNS name
    ElasticIP.PNG
  4. Register the hostname and elastic IP in DNS
    DNS.PNG
  5. Add you hostnames to /etc/hosts (Important!), note I also added puppet as this is the default for installs. This is a crucial step, so make sure you add your hostnames that you want to use. Put the public hostname first. As this is our primary hostname127.0.0.1  puppet.rangerrom.com puppet localhost
  6. Change the hostname of your EC2 Instance. We need to do the following

    #hostnamectl
    #sudo hostnamectl set-hostname puppet.rangerrom.com –static
    #sudo vi /etc/cloud/cloud.cfg

  7. Add the following to the end of cloud.cfg
    preserve_hostname: true
  8. This is the error I got when I first installed puppet (Due to low memory), therefore we will add port 4433 as well to the AWS security in the next step. I think this was due to insufficient memory, so use a T2.Medium instance size, so you have a minimum of 4GB of memory, else java kills itself. However I add it as a backup here in case you run some other service on 443.

    #sudo vi /var/log/puppetlabs/installer/2017-08-08T02.09.32+0000.install.log

    Failed to apply catalog: Connection refused – connect(2) for “puppet.rangerrom.com” port 4433

  9. Create a security group with the following ports open and also do the same for the Centos Firewall.
    PuppeSecurityGroups
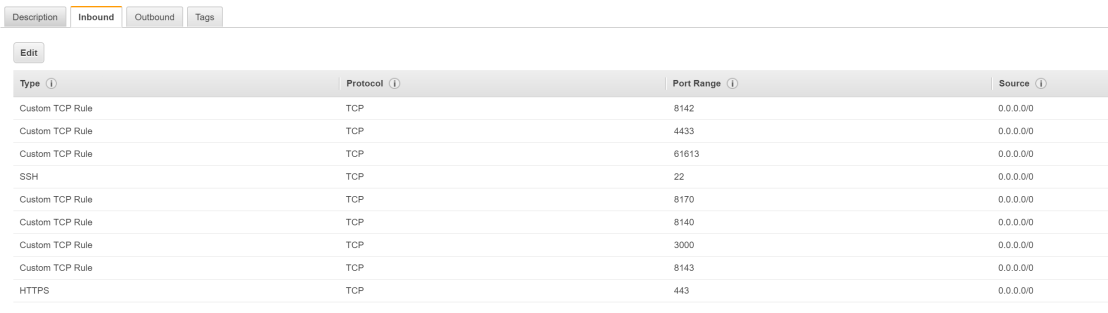
  10. Run  netstat -anp | grep tcp to ensure no port conflicts.
  11. Disable SELinux or have it configured to work in a Puppet Master environment. Edit

    #sudo vi /etc/sysconfig/selinux

    set
    SELINUX=disabled

  12. Edit the sudo vi /etc/ssh/sshd_config and enable Root Logins
    PermitRootLogin yes
  13. Download Puppet Enterprise

    #curl -O https://s3.amazonaws.com/pe-builds/released/2017.2.2/puppet-enterprise-2017.2.2-el-7-x86_64.tar.gz
    #tar -xvf puppet-enterprise-2017.2.2-el-7-x86_64.tar.gz

  14. Install NC and use it to test if your ports are accessible.
    sudo yum install nc
    nc -nlvp 3000 (Run in one terminal) 
  15. nc puppet 3000 ( Run from another terminal)
    NC Test Firewalls.PNG
    This is a great way to ensure firewall rules are not restricting your installation. Secondly we testing that the local server can resolve itself, as it is important that you can resolve puppet and also your custom FQDN before running PE install.
  16. Reboot and run hostnamectl, the new hostname should be preserved.

    #sudo hostnamectl set-hostname puppet.rangerrom.com –static
    [centos@ip-172-31-13-233 ~]$ hostnamectl
    Static hostname: puppet.rangerrom.com
    Transient hostname: ip-172-31-13-233.ap-southeast-2.compute.internal
    Icon name: computer-vm
    Chassis: vm
    Machine ID: 8bd05758fdfc1903174c9fcaf82b71ca
    Boot ID: 0227f164ff23498cbd6a70fb71568745
    Virtualization: xen
    Operating System: CentOS Linux 7 (Core)
    CPE OS Name: cpe:/o:centos:centos:7
    Kernel: Linux 3.10.0-514.26.2.el7.x86_64
    Architecture: x86-64

Installation

  1. Now that we done all our preinstall checks, kick off the installer.

    #sudo ./puppet-enterprise-installer

  2. Enter 1 for a guided install.
  3. Wait until it asks you to connect to the server on https://<fqdn&gt;:3000
    This is what occurs if you did not configure your hostname correctly and you want a public hostname (EC2 internal is default):
    PuppetInstallStage1.PNG

    We want our public hostname.
    PuppetInstallStage1Correct
    Puppet will basically run a thin web server to complete the installation with the following command:
    RACK_ENV=production /opt/puppetlabs/puppet/share/installer/vendor/bundler/bin/thin start –debug -p 3000 -a 0.0.0.0 –ssl –ssl-disable-verify &> /dev/null

  4. Recall, we have the above FQDN in our host file, yours will be your hostname that you setup.
  5. Visit your Puppetmaster site at https://fqdn:3000
  6. Ensure in DNS Alias, you add puppet and all other DNS names you want to use. Otherwise the installation will fail.

    You should see the correct default hostname, if not, you got issues…. I added some alias names such as puppet and my internal and external ec2 addresses.

    PuppetWebDNSAlias.PNG

  7. Set an Admin password and click next
  8. Check and double check the settings to confirm.
    PuppetConfirm.PNG
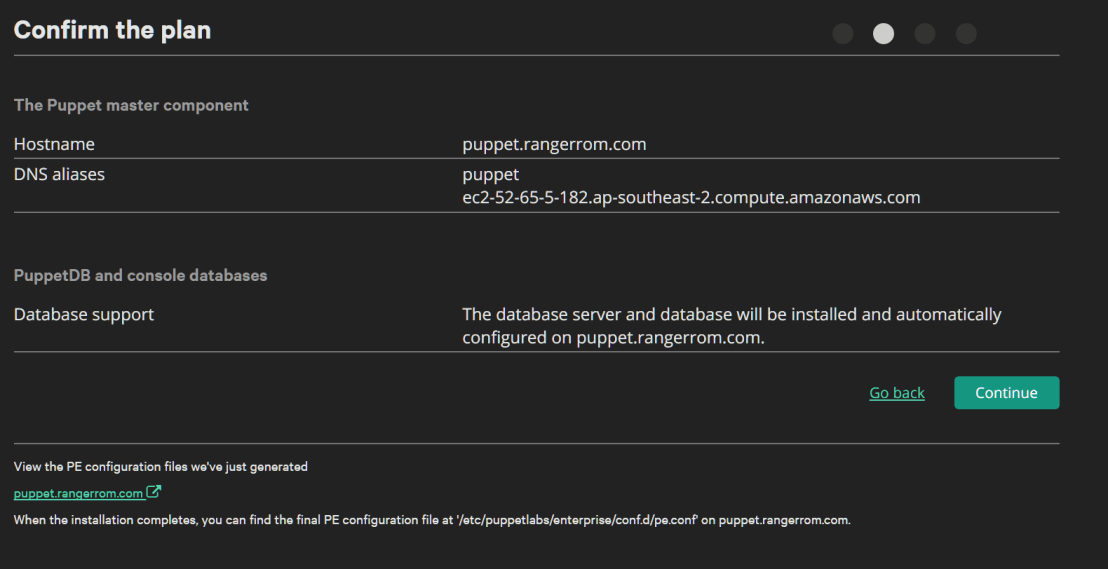
  9. Check the validation rules, since this is for testing, I am happy with the warnings. It would be awesome if puppetlabs did DNS name resolution validation checks on the HostName. Anyways, here we get a warning about memory, 4GB is what is needed, so if you have install failures it may be due to memory!
    Validator.PNG
  10. I am feeling lucky, lets try with 3533MB of RAM 🙂SuccessInstall.PNG

Migrating to AWS CodeCommit

Hosting your code in AWS CodeCommit has several advantages, the main one being seamless integration with AWS CodeDeploy and AWS CodePipeline.

I use SourceTree as my repo tool of choice, with Git/Bitbucket as the back end.

If you have a team of many developers and want to slowly migrate your code to AWS CodeCommit Git repo, you can setup your SourceTree config to push to both repo’s.

1. You will need a SSH-2-RSA 2048 Public/Private keys, this is what AWS supports. So once you have generated/imported the keys to AWS, you can then import the same key to your gihub or bitbucket account. Then just add them to your pageant. Read Setting Up AWS CodeCommit

2. In AWS, when you import your SSH keys for a IAM User, it will give you a SSH Key ID. Write down this SSH Key ID and the password for it will be the private key password you generated with PuttyGen. Always use a password for your private key file.

AWS IAM User SSH Key

3. In SourceTree, go to Tools/Options and set the private key to your AWS SSH Key. Remember we added this to Bitbucket and Git, so we can now use the AWS SSH Key/Pairs for both repositories.

SourceTree Private Key

The last part, is to configure your local repo to post to both repositories, until you happy with the migration.

4. In SourceTree, select your repository, and go to Repository/Repository Settings. Then add a new origin. It will be in this format: ssh://git-codecommit.us-east-1.amazonaws.com/v1/repos/MyCoolApp

5. When it prompts for a username and password, enter your SSH Key ID and SSH private key password

Source Tree Remote
Source Tree Remote

Once you happy with the migration, you can then set AWS CodeCommit as the default remote, by ticking the checkbox. You may need to first rename the original remote “origin” to “old” then set AWS as the default 🙂

My only gripe with CodeCommit is no built in hooks to deploy directly to S3.  This would be great for static assets.

#CodeCommit #AWS


Getting started with Amazon SQS

The data and metadata inflection point

We are nearing an inflection point regarding technology and data. Data is basically gold. In the next 30 years you will basically have a life logger app and many connected/smart devices. You will be able to rewind back in time and listen/look at a conversation you had with a random guy you met at a party.

You will punch into the Amazon Life Timeline service “Go to when a met a man wearing a shirt with Sponge Bob on it”. You wait a few seconds and a video appears at the exact moment you met the guy at a party.

Our lives will be transparent, our ego will be lowered, because we as a species are happy to share and be transparent. We will tip towards transparency and away from privacy, why? Because if we do not, we create a stumbling block in our technological evolution. Data is king, and this is the fundamental reason why companies pay so much for apps.

Google is not a search engine, it is going to be the most powerful artificial intelligent service offering in the world. One day you will use Google’s AI to optimize your life. It will track how you drive, when you sleep, when you come home; and by doing so, will have enough data collection points to run AI routines on your data and provide you with awesome benefits.

Likewise, Amazon Machine Learning services will be our AI friend.

As programmers we going to need to store data about data or data about the bits that we send to the internet… Metadata.

One way to do so is by asynchronous messaging. You will of course have an App/Smart Device that needs to send data or metadata about user behavior.

Queue Sender

Your app can send small data messages as a user is consuming your service to an Amazon Queue on the cloud.

using System;
using System.Collections;
using System.Collections.Generic;
using System.Web;
using Amazon;
using Amazon.Runtime;
using Amazon.SQS;
using Amazon.SQS.Model;
using Amazon.Util;

namespace Wangle.Queue.Client
{
    public class AwsClient : IQueueClient
    {
        private AmazonSQSClient _client;
        private string defaultQueueUrl;

        public void Initialize(string url)
        {
            ProfileManager.RegisterProfile(&quot;Wangle&quot;, &quot;myaccessKey&quot;,&quot;mysecretkey&quot;);
            var amazonSqsConfig = new AmazonSQSConfig { ServiceURL = &quot;http://sqs.us-east-1.amazonaws.com&quot; };
            _client = new AmazonSQSClient(ProfileManager.GetAWSCredentials(&quot;Wangle&quot;), amazonSqsConfig);
            defaultQueueUrl = url;
        }

        public void SendMessage(string message)
        {
            var sendMessageRequest = new SendMessageRequest
            {
                QueueUrl = defaultQueueUrl,
                MessageBody = $&quot;{message} + {DateTimeOffset.UtcNow}&quot; //Unicode Only!
            };

            _client.SendMessageAsync(sendMessageRequest);

        }

        public IList&amp;lt;string&amp;gt; ReceiveMessage()
        {
            var data = new List&amp;lt;string&amp;gt;();
            var receiveMessageRequest = new ReceiveMessageRequest
            {
                QueueUrl = defaultQueueUrl,
                MaxNumberOfMessages = 10,
            };

            var receiveMessageResponse = _client.ReceiveMessage(receiveMessageRequest);

            receiveMessageResponse.Messages.ForEach(m =&amp;gt;
            {
                var receiptHandle = m.ReceiptHandle;
                data.Add(m.Body);
                _client.DeleteMessageAsync(defaultQueueUrl, receiptHandle);
            });
            return data;
        }
    }
}

Cloud Data Retention Receiver

Once the message is now in the message queue in the cloud, you will have a service in the cloud process this message and store it a Big Data Service. Below is the code to get the the message off the queue.

class Program
    {
        static void Main(string[] args)
        {
            //Fake a worker role service running in Amazon Cloud that processes data storage.
            Console.WriteLine(&quot;Fetching data logs from queue to prepare for governance...&quot;);
            var queueClient = new AwsClient();
            queueClient.Initialize(Settings.Default.QueueURL);

            while (true)
            {
                queueClient.ReceiveMessage().ToList().ForEach(m =&gt; Console.WriteLine(m));

                //ToDo: Store the audit data in AmazonS3 or Big Data service: User, Url, DateTimeUtc, SourceIP, DestIP
                Thread.Sleep(TimeSpan.FromSeconds(2));
            }

        }
    }


Summary

So that is basically the code you need. Of course you will need to install the Amazon Service SDK from Nuget.

This should get you going in the right direction when you need to send data to the cloud over the wire for later processing.

I am sure Amazon SQS will be used to start sending data asynchronously for  Fitbit information, how long you sleep for, how you drive your car and many more. Soon all our devices will be smart e.g. A cooking pot with a chip, your shirt with a chip …

See you soon in VR land…