Tag: PuppetEnterprise

Puppet Enterprise – Structure your Hiera Data

Synopsis

This post will discuss how to structure your Hiera Data, so that your profiles will automatically inject the parameters.

Why? So we can keep our profile classes and other classes super clean and succinct.

If you have If else statements in your classed depending on what environment or node the code is running on, you might have a code structure smell. Lets dig in.

Assumptions

You are using a Puppet Control Repository and leveraging Code Manager (R10K) to manage your code with Puppet Enterprise

Secondly you are using Profiles and Roles pattern to structure your classes.

I highly recommend you download the Puppet Control Repository template here.

Profiles and Roles

The most important aspect to consider is structuring your Profiles and Roles to accept parameters that can be resolved and matched to Hiera Data.

Here we have a role for all our Jumpboxes that we can use to remote into.
As we can see it will have the following profiles applied:


class role::jumpbox {
include profile::base
include profile::jumpbox::jumpboxsoftware
include profile::jumpbox::firewall
include profile::jumpbox::hosts
}

Lets pick one of these profiles that require data from Hiera.


class profile::jumpbox::hosts (
  String $hostname = 'changeme',
  String $ip = 'changeme',
)
{
  host { $hostname:
    ensure => present,
    ip     => $ip,
  }
}

The above profile ensures that the /etc/hosts file has some entries in it.

It accepts two parameters:
profile::jumpbox::hosts::ip

profile::jumpbox::hosts::hostname

Similar to Java or C# we can use a sort of dependency injection technique, where puppet will automatically look for this parameter in Hiera; a key/value store.

Hiera

The trick is to structure your Hiera Data and use the same Fully Qualified Names in the keys.

Each environment needs a different set of host names.

I then have the following structure in the control repro

.data\<environment1>\jumpbox\conf.yaml
.data\<environment2>\jumpbox\conf.yaml
.data\<environment3>\jumpbox\conf.yaml

Each folder in data represents an Environment in Puppet Classifications:

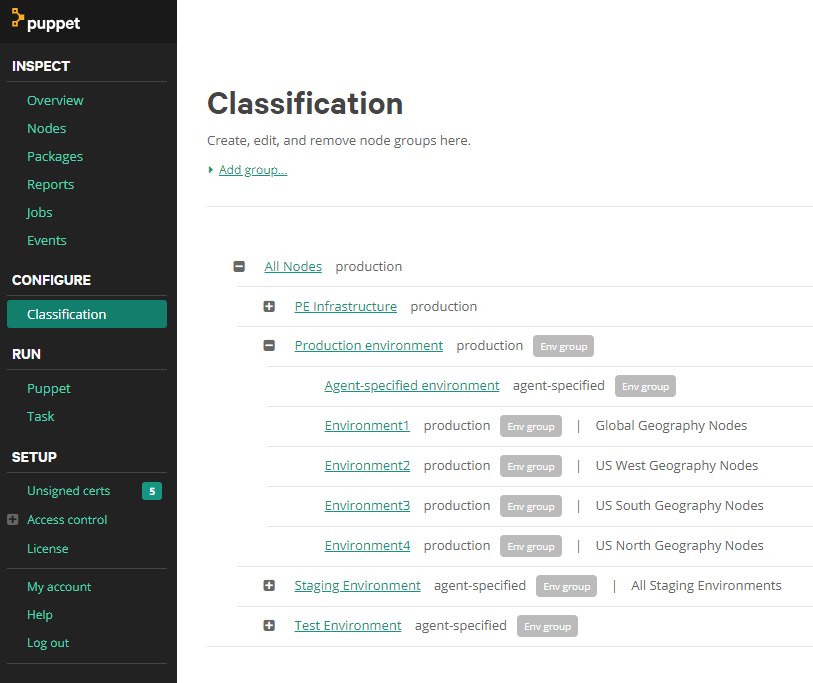
The second important convention is we use a geography variable in each Environment to resolve Hiera Data automatically.

Go to your Puppet Master Enterprise Web Console and manage the Classifications.

What you are doing is creating a variable that can be used by the hiera.yaml file to dynamically load data for the correct environment when the agent runs.

On the Puppet Master we need to setup our environments to match the Control Repository and add the magic variable. Any Node that runs the puppet agent will then have this variable set. This can then be used to load the corresponding Hiera config file.

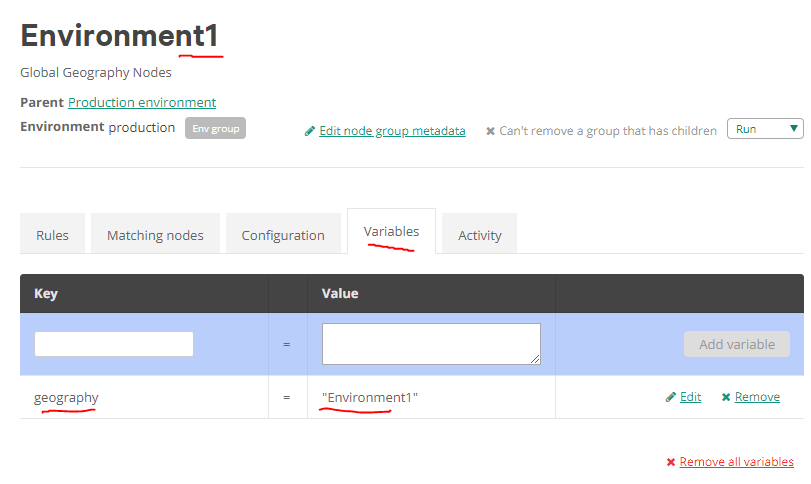
Here we can see Environment1 has a variable defined called geography that matches the Environment name. We can then leverage this convention:

Puppet Profile -> Hiere Data lookup -> Folder that matches the variable name -> resolve parameter

This is all done automatically for you.

Puppet Control Repository Structure

The repository then looks like this:

Let us dig a little deeper and see how this structure is configured.

hiera.yaml

.\hiera.yaml

This file now contains the instructions to tell Hiera how to load our data.

—hiera.yaml—


---
version: 1

defaults:
  datadir: "data"

hierarchy:
  - name: 'Yaml Key Value Store'
    data_hash: yaml_data
    paths:
      - "%{geography}/jumpbox/conf.yaml"
      - "common.yaml"

  - name: "Encrypted Data"
    lookup_key: eyaml_lookup_key
    paths: 
      - "%{geography}/jumpbox/secrets.eyaml"
      - "common.eyaml"
    options:
      pkcs7_private_key: /etc/puppetlabs/puppet/eyaml/private_key.pkcs7.pem
      pkcs7_public_key: /etc/puppetlabs/puppet/eyaml/public_key.pkcs7.pem

Data – yaml

the .yaml files will contain the same variable names (fully qualified) that match the PROFILE files e.g.

—conf.yaml—


profile::jumpbox::hosts::hostname: 'rdp.rangerrom.com'
profile::jumpbox::hosts::ip: 8.8.8.8'

As you can see above. As long as your profiles and parameters match, Hiera will automatically inject the correct parameter for each environment.

Hiera will resolve – %{geography}/jumpbox/conf.yaml

In the Puppet master you had setup your classifications, so when the puppet agent runs on Environment1 nodes, it will get the jumpbox/conf.yaml that matches the variable name geography=”Environment1″

Encrypted Data – eyaml

Encrypted data is just as easy to store.
* Generate the encrypted data.
* Store the data in an eyaml file in the same folder as the yaml data.
* Add a path to the data in the hiera.yaml file.

We have encrypted data e.g. the default local admin account setup via the profile – include profile::base
We use the Puppet Master private key to generate the encrypted data, see the end of this blog on how to create encrypted data.

—secrets.eyaml—


profile::base::adminpassword: >
    ENC[PKCS7,MIIBeQYJKoZIhvcNAQcDoIIBajCCAWYCAQAxggEhMIIBHQIBADAFMAACAQEw
    DQYJKoZIhvcNAQEBBQAEggEAnMWlddVoU9lC8tBNvOLI9OYI6xtCD0y3NIVe
    Ylm25dUZ8sqGP+yVQ8Y0P5xIse5f/WVOkavByZJK5yV4fDYFpD6IhXk4IJUe
    dVUw8VmO/RG84AknDDrtNPlSPm4uQqYPOOa0BmgO1iiOY4rcAxhFzT5nzod3
    MIK7lmbuP859R5jtJ5PZxZKCNERGY+dxUZfcdPs0/zr/KgLGcHc/awzYtEuI
    0tOGPp80gTVkhmCHO7KuClsg97XTRGi0BfiuiyjOWLIeAx5hbhMHi65ZPl5U
    MlJFoTA1nw3ATcC6NL3ikECWaQrt2xyxZ1uoYKqvN0ClsFLIqBQ1gXRTvQPD
    SlBQqDA8BgkqhkiG9w0BBwEwHQYJYIZIAWUDBAEqBBCWLuT77kT6q/ojfjKx
    wk17gBATvEM58mGyP5CGbMqlbEip]

How to Encrypt Data

SSH into the Puppet Master. Locate your Puppet Master Certificates. Then run the following


puppetmaster@rangerrom.com:~$ sudo /opt/puppetlabs/puppet/bin/eyaml encrypt -p --pkcs7-public-key=/etc/puppetlabs/puppet/eyaml/public_key.pkcs7.pem

Enter password: ***
string: ENC[PKCS7,MIIBeQYJKoZIhvcNAQcDoIIBajCCAWYCAQAxggEhMIIBHQIBADAFMAACAQEwDQYJKoZIhvcNAQEBBQAEggEAnMWlddVoU9lC8tBNvOLI9OYI6xtCD0y3NIVeYlm25dUZ8sqGP+yVQ8Y0P5xIse5f/WVOkavByZJK5yV4fDYFpD6IhXk4IJUedVUw8VmO/RG84AknDDrtNPlSPm4uQqYPOOa0BmgO1iiOY4rcAxhFzT5nzod3MIK7lmbuP859R5jtJ5PZxZKCNERGY+dxUZfcdPs0/zr/KgLGcHc/awzYtEuI0tOGPp80gTVkhmCHO7KuClsg97XTRGi0BfiuiyjOWLIeAx5hbhMHi65ZPl5UMlJFoTA1nw3ATcC6NL3ikECWaQrt2xyxZ1uoYKqvN0ClsFLIqBQ1gXRTvQPDSlBQqDA8BgkqhkiG9w0BBwEwHQYJYIZIAWUDBAEqBBCWLuT77kT6q/ojfjKxwk17gBATvEM58mGyP5CGbMqlbEip]

OR

block: >
    ENC[PKCS7,MIIBeQYJKoZIhvcNAQcDoIIBajCCAWYCAQAxggEhMIIBHQIBADAFMAACAQEw
    DQYJKoZIhvcNAQEBBQAEggEAnMWlddVoU9lC8tBNvOLI9OYI6xtCD0y3NIVe
    Ylm25dUZ8sqGP+yVQ8Y0P5xIse5f/WVOkavByZJK5yV4fDYFpD6IhXk4IJUe
    dVUw8VmO/RG84AknDDrtNPlSPm4uQqYPOOa0BmgO1iiOY4rcAxhFzT5nzod3
    MIK7lmbuP859R5jtJ5PZxZKCNERGY+dxUZfcdPs0/zr/KgLGcHc/awzYtEuI
    0tOGPp80gTVkhmCHO7KuClsg97XTRGi0BfiuiyjOWLIeAx5hbhMHi65ZPl5U
    MlJFoTA1nw3ATcC6NL3ikECWaQrt2xyxZ1uoYKqvN0ClsFLIqBQ1gXRTvQPD
    SlBQqDA8BgkqhkiG9w0BBwEwHQYJYIZIAWUDBAEqBBCWLuT77kT6q/ojfjKx
    wk17gBATvEM58mGyP5CGbMqlbEip]
puppetmaster@rangerrom.com:~$


Advertisement
Puppet – Join Ubuntu 16.04 Servers to an Azure Windows Active Directory Domain

Puppet – Join Ubuntu 16.04 Servers to an Azure Windows Active Directory Domain

We use Azure Active Directory Domain Services and wanted a single sign on solution for Windows and Linux. The decision was made to join all servers to the Windows Domain in addition to having SSH Key auth.

I assume you know how to use Puppet Code Manager and have a Puppet Control Repository to manage Roles and Profiles.

Ensure you have a Active Directory Service Account that has permissions to join a computer to a domain. You can store this user in Hiera.

The module we need is called Realmd, however the current version (Version 2.3.0 released Sep 3rd 2018) does not support Ubuntu  16.04. So I have a forked repro here that you can use.

Modules

puppetfile


mod 'romiko-realmd',
  :git    => 'https://github.com/Romiko/realmd.git',
  :branch => 'master'

mod 'saz-resolv_conf',                  '4.0.0'

linuxdomain.pp


class profile::domain::linuxdomain (
  String $domain = 'RANGERROM.COM',
  String $user = 'romiko.derbynew@rangerrom.com',
  String $password = 'info',
  Array  $aadds_dns = ['10.0.103.36','10.0.103.37']
) {

  $hostname = $trusted['hostname']
  $domaingroup = downcase($domain)

  host { 'aaddshost':
    ensure  => present,
    name    => "${hostname}.${domain}",
    comment => 'Azure Active Directory Domain Services',
    ip      => '127.0.0.1',
  }

  class { 'resolv_conf':
    nameservers => $aadds_dns,
    searchpath  => [$domain],
  }

  exec { "waagent":
    path        => ['/usr/bin', '/usr/sbin', '/bin'],
    command     => "waagent -start",
    refreshonly => true,
    subscribe   => [File_line['waagent.conf']],
  }

  exec { "changehostname":
    path        => ['/usr/bin', '/usr/sbin', '/bin'],
    command     => "hostnamectl set-hostname ${hostname}.${domain}",
    refreshonly => true,
    subscribe   => [File_line['waagent.conf']],
  }

  file_line { 'waagent.conf':
    ensure             => present,
    path               => '/etc/waagent.conf',
    line               => 'Provisioning.MonitorHostName=y',
    match              => '^Provisioning.MonitorHostName=n',
    append_on_no_match => false,
  }

  class { 'ntp':
    servers => [ $domain ],
  }

  class { '::realmd':
    domain                => $domain,
    domain_join_user      => $user,
    domain_join_password  => $password
  } ->

  file_line { 'sssd.conf':
  ensure             => present,
  path               => '/etc/sssd/sssd.conf',
  line               => '#use_fully_qualified_names = True',
  match              => '^use_fully_qualified_names',
  append_on_no_match => false,
  }

  file_line { 'common-session':
  path => '/etc/pam.d/common-session',
  line => 'session required        pam_mkhomedir.so skel=/etc/skel/ umask=0077',
  }

  file_line { 'sudo_rule':
  path => '/etc/sudoers',
  line => "%aad\ dc\ administrators@${domaingroup} ALL=(ALL) NOPASSWD:ALL",
  }
}

The above code ensures:

  • Its fqdn is in the /etc/hosts file so it can resolve to itself.
  • The Active Directory DNS servers are in resolv.conf and the default search domain is set. This allows nslookup to <computername> to work as well as <computername>.<domainname>
  • Renames the Linux Server and sets Azure to monitor host name changes
  • Sets the Network Time Protocol to use the Active Directory Severs
  • Uses Realmd 
    • Join the domain
    • configure Sssd, samba etc
    • We using my fork until the pull request is accepted
  • Makes changes to SSSD and PAM to ensure smooth operations with Azure Active Directory Domain Services
  • Adds the administrators from AADDS to the sudoers


With the above running on your Linux agent, you will have Linux machines using the domain and can leverage single sign on.

CASE SENSITIVE –  Ensure you use Upper Case for $domain.

My source of inspiration to do this configuration came from a Microsoft Document here:

https://docs.microsoft.com/en-us/azure/active-directory-domain-services/active-directory-ds-join-ubuntu-linux-vm

However, here is a Hiera config file to get you going for this class if you like using a key value data source.

common.yaml

#AADDS Domain must be Upper Case else Kerberos Tickets fail
profile::domain::linuxdomain::domain: 'RANGERROM.COM'
profile::domain::linuxdomain::user: 'serviceaccounttojoindomain@RANGERROM.COM'
profile::domain::linuxdomain::aadds_dns:
        - '10.0.103.36'
        - '10.0.103.37'

common.eyaml

profile::domain::linuxdomain::password:
    ENC[PKCS7,MIIBiQ.....==]

In my next article, I will write about setting up a flexible Puppet Control Repository and leveraging Hiera.

Now I can login to the server using my Azure Active Directory credentials that I even use for Outlook, Skype and other Microsoft Products.

ssh -l romiko.derbynew@rangerrom.com myserver   (resolv.conf has a search entry for rangerrom.com, so the suffix will get applied)
ssh -l romiko.derbynew@rangerrom.com myserver.rangerrom.com

Cheers

Installing Puppet Enterprise on CentOS 7 in AWS EC2 with custom public HostName

Hey,

I ran into a few issues when I wanted to install Puppet Enterprise 2-17 in AWS as an EC2 instance. The main issues were

Summary

  • Need to use hostnamectl and cloud.cfg to change my hostname, as I wanted puppet on a public address, not private address, just for a POC
  • I was using a t2.nano and t2.micro, which will not work with Puppet Enterprise 2017 (puppet-enterprise-2017.2.2-el-7-x86_64). The error you get is just Failed to run PE Installer…… So I used a t2.medium to get around the issue.
  • The usual /etc/hosts file needs some settings and DNS registration (Route53 for me)
  • Disabled SELinux (We usually use a VPN)
  • Configure security groups and have 4433 as backup port (Probably not needed)

Preliminary Install Tasks

  1. Get the latest image from CentOS 7 (x86_64) – with Updates HVM
  2. Spin up an instance with at least 4GB memory, I had a lot of installation issues with applying the catalog with low memory. T2.Medium should work. Bigger is better!
    [puppet.rangerrom.com] Failed to run PE installer on puppet.rangerrom.com.
  3. If you not using a VPN then ensure you setup an elastic IP mapped to the instance for the public DNS name
    ElasticIP.PNG
  4. Register the hostname and elastic IP in DNS
    DNS.PNG
  5. Add you hostnames to /etc/hosts (Important!), note I also added puppet as this is the default for installs. This is a crucial step, so make sure you add your hostnames that you want to use. Put the public hostname first. As this is our primary hostname127.0.0.1  puppet.rangerrom.com puppet localhost
  6. Change the hostname of your EC2 Instance. We need to do the following

    #hostnamectl
    #sudo hostnamectl set-hostname puppet.rangerrom.com –static
    #sudo vi /etc/cloud/cloud.cfg

  7. Add the following to the end of cloud.cfg
    preserve_hostname: true
  8. This is the error I got when I first installed puppet (Due to low memory), therefore we will add port 4433 as well to the AWS security in the next step. I think this was due to insufficient memory, so use a T2.Medium instance size, so you have a minimum of 4GB of memory, else java kills itself. However I add it as a backup here in case you run some other service on 443.

    #sudo vi /var/log/puppetlabs/installer/2017-08-08T02.09.32+0000.install.log

    Failed to apply catalog: Connection refused – connect(2) for “puppet.rangerrom.com” port 4433

  9. Create a security group with the following ports open and also do the same for the Centos Firewall.
    PuppeSecurityGroups
  10. Run  netstat -anp | grep tcp to ensure no port conflicts.
  11. Disable SELinux or have it configured to work in a Puppet Master environment. Edit

    #sudo vi /etc/sysconfig/selinux

    set
    SELINUX=disabled

  12. Edit the sudo vi /etc/ssh/sshd_config and enable Root Logins
    PermitRootLogin yes
  13. Download Puppet Enterprise

    #curl -O https://s3.amazonaws.com/pe-builds/released/2017.2.2/puppet-enterprise-2017.2.2-el-7-x86_64.tar.gz
    #tar -xvf puppet-enterprise-2017.2.2-el-7-x86_64.tar.gz

  14. Install NC and use it to test if your ports are accessible.
    sudo yum install nc
    nc -nlvp 3000 (Run in one terminal) 
  15. nc puppet 3000 ( Run from another terminal)
    NC Test Firewalls.PNG
    This is a great way to ensure firewall rules are not restricting your installation. Secondly we testing that the local server can resolve itself, as it is important that you can resolve puppet and also your custom FQDN before running PE install.
  16. Reboot and run hostnamectl, the new hostname should be preserved.

    #sudo hostnamectl set-hostname puppet.rangerrom.com –static
    [centos@ip-172-31-13-233 ~]$ hostnamectl
    Static hostname: puppet.rangerrom.com
    Transient hostname: ip-172-31-13-233.ap-southeast-2.compute.internal
    Icon name: computer-vm
    Chassis: vm
    Machine ID: 8bd05758fdfc1903174c9fcaf82b71ca
    Boot ID: 0227f164ff23498cbd6a70fb71568745
    Virtualization: xen
    Operating System: CentOS Linux 7 (Core)
    CPE OS Name: cpe:/o:centos:centos:7
    Kernel: Linux 3.10.0-514.26.2.el7.x86_64
    Architecture: x86-64

Installation

  1. Now that we done all our preinstall checks, kick off the installer.

    #sudo ./puppet-enterprise-installer

  2. Enter 1 for a guided install.
  3. Wait until it asks you to connect to the server on https://<fqdn&gt;:3000
    This is what occurs if you did not configure your hostname correctly and you want a public hostname (EC2 internal is default):
    PuppetInstallStage1.PNG

    We want our public hostname.
    PuppetInstallStage1Correct
    Puppet will basically run a thin web server to complete the installation with the following command:
    RACK_ENV=production /opt/puppetlabs/puppet/share/installer/vendor/bundler/bin/thin start –debug -p 3000 -a 0.0.0.0 –ssl –ssl-disable-verify &> /dev/null

  4. Recall, we have the above FQDN in our host file, yours will be your hostname that you setup.
  5. Visit your Puppetmaster site at https://fqdn:3000
  6. Ensure in DNS Alias, you add puppet and all other DNS names you want to use. Otherwise the installation will fail.

    You should see the correct default hostname, if not, you got issues…. I added some alias names such as puppet and my internal and external ec2 addresses.

    PuppetWebDNSAlias.PNG

  7. Set an Admin password and click next
  8. Check and double check the settings to confirm.
    PuppetConfirm.PNG
  9. Check the validation rules, since this is for testing, I am happy with the warnings. It would be awesome if puppetlabs did DNS name resolution validation checks on the HostName. Anyways, here we get a warning about memory, 4GB is what is needed, so if you have install failures it may be due to memory!
    Validator.PNG
  10. I am feeling lucky, lets try with 3533MB of RAM 🙂SuccessInstall.PNG