Octopus Deploy has great add on template steps. Using the
AWS – Register ELB Instance
AWS – Deregister ELB Instance
You can then leverage Environments to create Web Server Groups and thus automate deploying your web server instances.
The first step is for Development and Staging, which do not use an ELB
The next 4 steps is for Web Servers in Group 1
The last 4 steps is for Web Servers in Group 2
A Powershell script is used to poll the web server, after the NUGET package is used to deploy the website. It will poll the Web Servers in the group until the homepage returns an HTTP 200 code for all of them. The homepage does various calls to the database, so this page is great to use. You could also create a custom up-time endpoint to query. A really cool way, is to have an API endpoint that returns which servers are up and use this to validate the step for polling.
I ran into a few issues when I wanted to install Puppet Enterprise 2-17 in AWS as an EC2 instance. The main issues were
Summary
Need to use hostnamectl and cloud.cfg to change my hostname, as I wanted puppet on a public address, not private address, just for a POC
I was using a t2.nano and t2.micro, which will not work with Puppet Enterprise 2017 (puppet-enterprise-2017.2.2-el-7-x86_64). The error you get is just Failed to run PE Installer…… So I used a t2.medium to get around the issue.
The usual /etc/hosts file needs some settings and DNS registration (Route53 for me)
Disabled SELinux (We usually use a VPN)
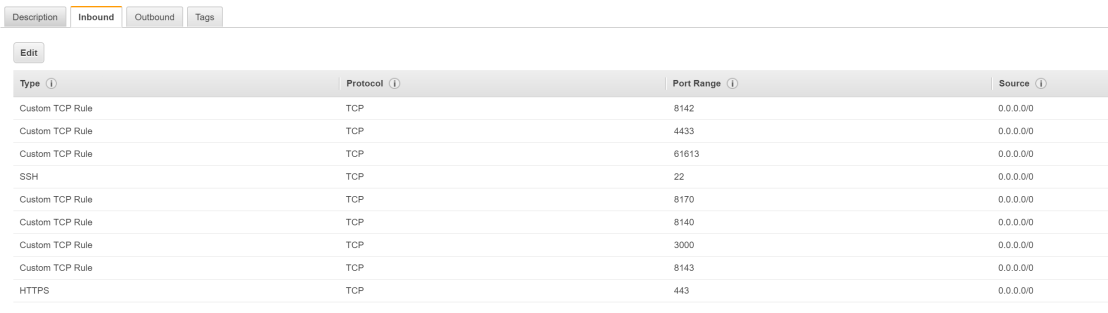
Configure security groups and have 4433 as backup port (Probably not needed)
Spin up an instance with at least 4GB memory, I had a lot of installation issues with applying the catalog with low memory. T2.Medium should work. Bigger is better! [puppet.rangerrom.com] Failed to run PE installer on puppet.rangerrom.com.
If you not using a VPN then ensure you setup an elastic IP mapped to the instance for the public DNS name
Register the hostname and elastic IP in DNS
Add you hostnames to /etc/hosts (Important!), note I also added puppet as this is the default for installs. This is a crucial step, so make sure you add your hostnames that you want to use. Put the public hostname first. As this is our primary hostname127.0.0.1 puppet.rangerrom.com puppet localhost
Change the hostname of your EC2 Instance. We need to do the following
#hostnamectl #sudo hostnamectl set-hostname puppet.rangerrom.com –static #sudo vi /etc/cloud/cloud.cfg
Add the following to the end of cloud.cfg preserve_hostname: true
This is the error I got when I first installed puppet (Due to low memory), therefore we will add port 4433 as well to the AWS security in the next step. I think this was due to insufficient memory, so use a T2.Medium instance size, so you have a minimum of 4GB of memory, else java kills itself. However I add it as a backup here in case you run some other service on 443.
#sudo vi /var/log/puppetlabs/installer/2017-08-08T02.09.32+0000.install.log
Failed to apply catalog: Connection refused – connect(2) for “puppet.rangerrom.com” port 4433
Create a security group with the following ports open and also do the same for the Centos Firewall.
Run netstat -anp | grep tcp to ensure no port conflicts.
Disable SELinux or have it configured to work in a Puppet Master environment. Edit
#sudo vi /etc/sysconfig/selinux
set SELINUX=disabled
Edit the sudo vi /etc/ssh/sshd_config and enable Root Logins PermitRootLogin yes
Install NC and use it to test if your ports are accessible.
sudo yum install nc nc -nlvp 3000 (Run in one terminal)
nc puppet 3000 ( Run from another terminal)
This is a great way to ensure firewall rules are not restricting your installation. Secondly we testing that the local server can resolve itself, as it is important that you can resolve puppet and also your custom FQDN before running PE install.
Reboot and run hostnamectl, the new hostname should be preserved.
Now that we done all our preinstall checks, kick off the installer.
#sudo ./puppet-enterprise-installer
Enter 1 for a guided install.
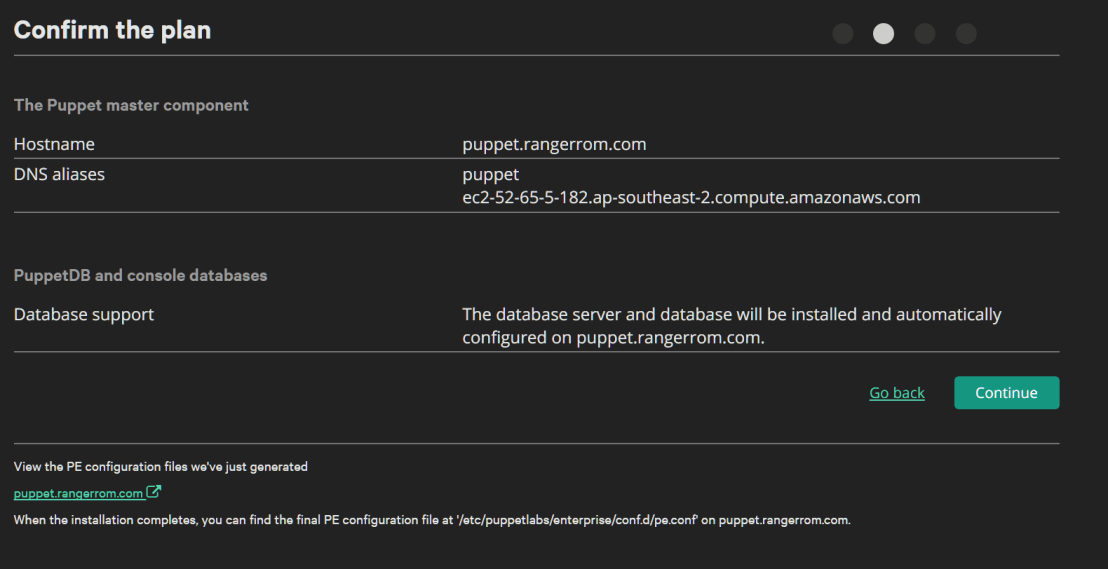
Wait until it asks you to connect to the server on https://<fqdn>:3000
This is what occurs if you did not configure your hostname correctly and you want a public hostname (EC2 internal is default):
We want our public hostname.
Puppet will basically run a thin web server to complete the installation with the following command:
RACK_ENV=production /opt/puppetlabs/puppet/share/installer/vendor/bundler/bin/thin start –debug -p 3000 -a 0.0.0.0 –ssl –ssl-disable-verify &> /dev/null
Recall, we have the above FQDN in our host file, yours will be your hostname that you setup.
Ensure in DNS Alias, you add puppet and all other DNS names you want to use. Otherwise the installation will fail.
You should see the correct default hostname, if not, you got issues…. I added some alias names such as puppet and my internal and external ec2 addresses.
Set an Admin password and click next
Check and double check the settings to confirm.
Check the validation rules, since this is for testing, I am happy with the warnings. It would be awesome if puppetlabs did DNS name resolution validation checks on the HostName. Anyways, here we get a warning about memory, 4GB is what is needed, so if you have install failures it may be due to memory!
I am amazed by the complex solutions out on the internet to upper case the first letter of a word in SQL. Here is a way I think is nice and simple.
-- Test Data

declare @word varchar(100)
with good as (select 'good' as a union select 'nice' union select 'fine')
select @word = (SELECT TOP 1 a FROM good ORDER BY NEWID())

-- Implementation

select substring(Upper(@word),1,1) + substring(@word, 2, LEN(@word))
The problem with Request.Browser.IsMobileDevice is that it will classify a tablet as a mobile device.
If you need to discern between mobile, tablet and desktop. Then use the following extension method.
public static class HttpBrowserCapabilitiesBaseExtensions
{
 public static bool IsMobileNotTablet(this HttpBrowserCapabilitiesBase browser)
 {
  var userAgent = browser.Capabilities[""].ToString();
  var r = new Regex("ipad|(android(?!.*mobile))|xoom|sch-i800|playbook|tablet|kindle|nexus|silk", RegexOptions.IgnoreCase);
  var isTablet = r.IsMatch(userAgent) && browser.IsMobileDevice;
  return !isTablet && browser.IsMobileDevice;
 }
}
Then to use it is easy. Just import the namespace and reference the method.
using Web.Public.Helpers;
...
if (Request.Browser.IsMobileNotTablet() && !User.IsSubscribed)
....
You can do a lot of cusomisation with JWPlayer via CSS skinning with V7, but it has it’s limitations…
Sometimes you need to show an image on a hosted JWPlayer.. It is especially important for mobile devices, as autoplay is disabled on phones, so an image is great feature to have:
<script>
function setupPlayer(container,jwFeedUrl, cameraImage) {
  var xhttp = new XMLHttpRequest();
  xhttp.open("GET", jwFeedUrl, true);
  xhttp.send();
  xhttp.onreadystatechange = function () {
  if (xhttp.readyState == 4 && xhttp.status == 200) {
   var list = JSON.parse(xhttp.responseText).playlist;
   list[0].image = cameraImage;
   var playerone = jwplayer(container);
   playerone.setup({
    playlist: list,
     mute: 'true',
     autostart: 'true'
   });
  } else if (xhttp.readyState == 4 && xhttp.status == 404) {
     Console.log("Error loading player " + jwFeedUrl);
    }
 };
}

setupPlayer("myDivId","https://content.jwplatform.com/feeds/x12U4l67.json","http://assets.rangerrom.com/portrait/rangerrom.png");

</script>
JWPlayer Setup Timeout Issues
If you ever see get a Setup Timout error from JWPlayer. A useful workaround if you do not have time to optimise the website asset pipeline is to load the JWPlayer only once the html document is ready.
document.addEventListener("DOMContentLoaded", function (event) {
setupPlayer(...);
A spare circuit board to practice your soldering skills. You cannot afford to make a mistake when soldering.
Star Phillips screw driver
3mm Drill bit
3M x 6mm bolts and nuts, used to fix the cover to the case. It is tricky getting the nut to fit in the small gap on the Touch 2.0. I just drill holes on the side of the Kobo and slide the nut in like a coin slot.
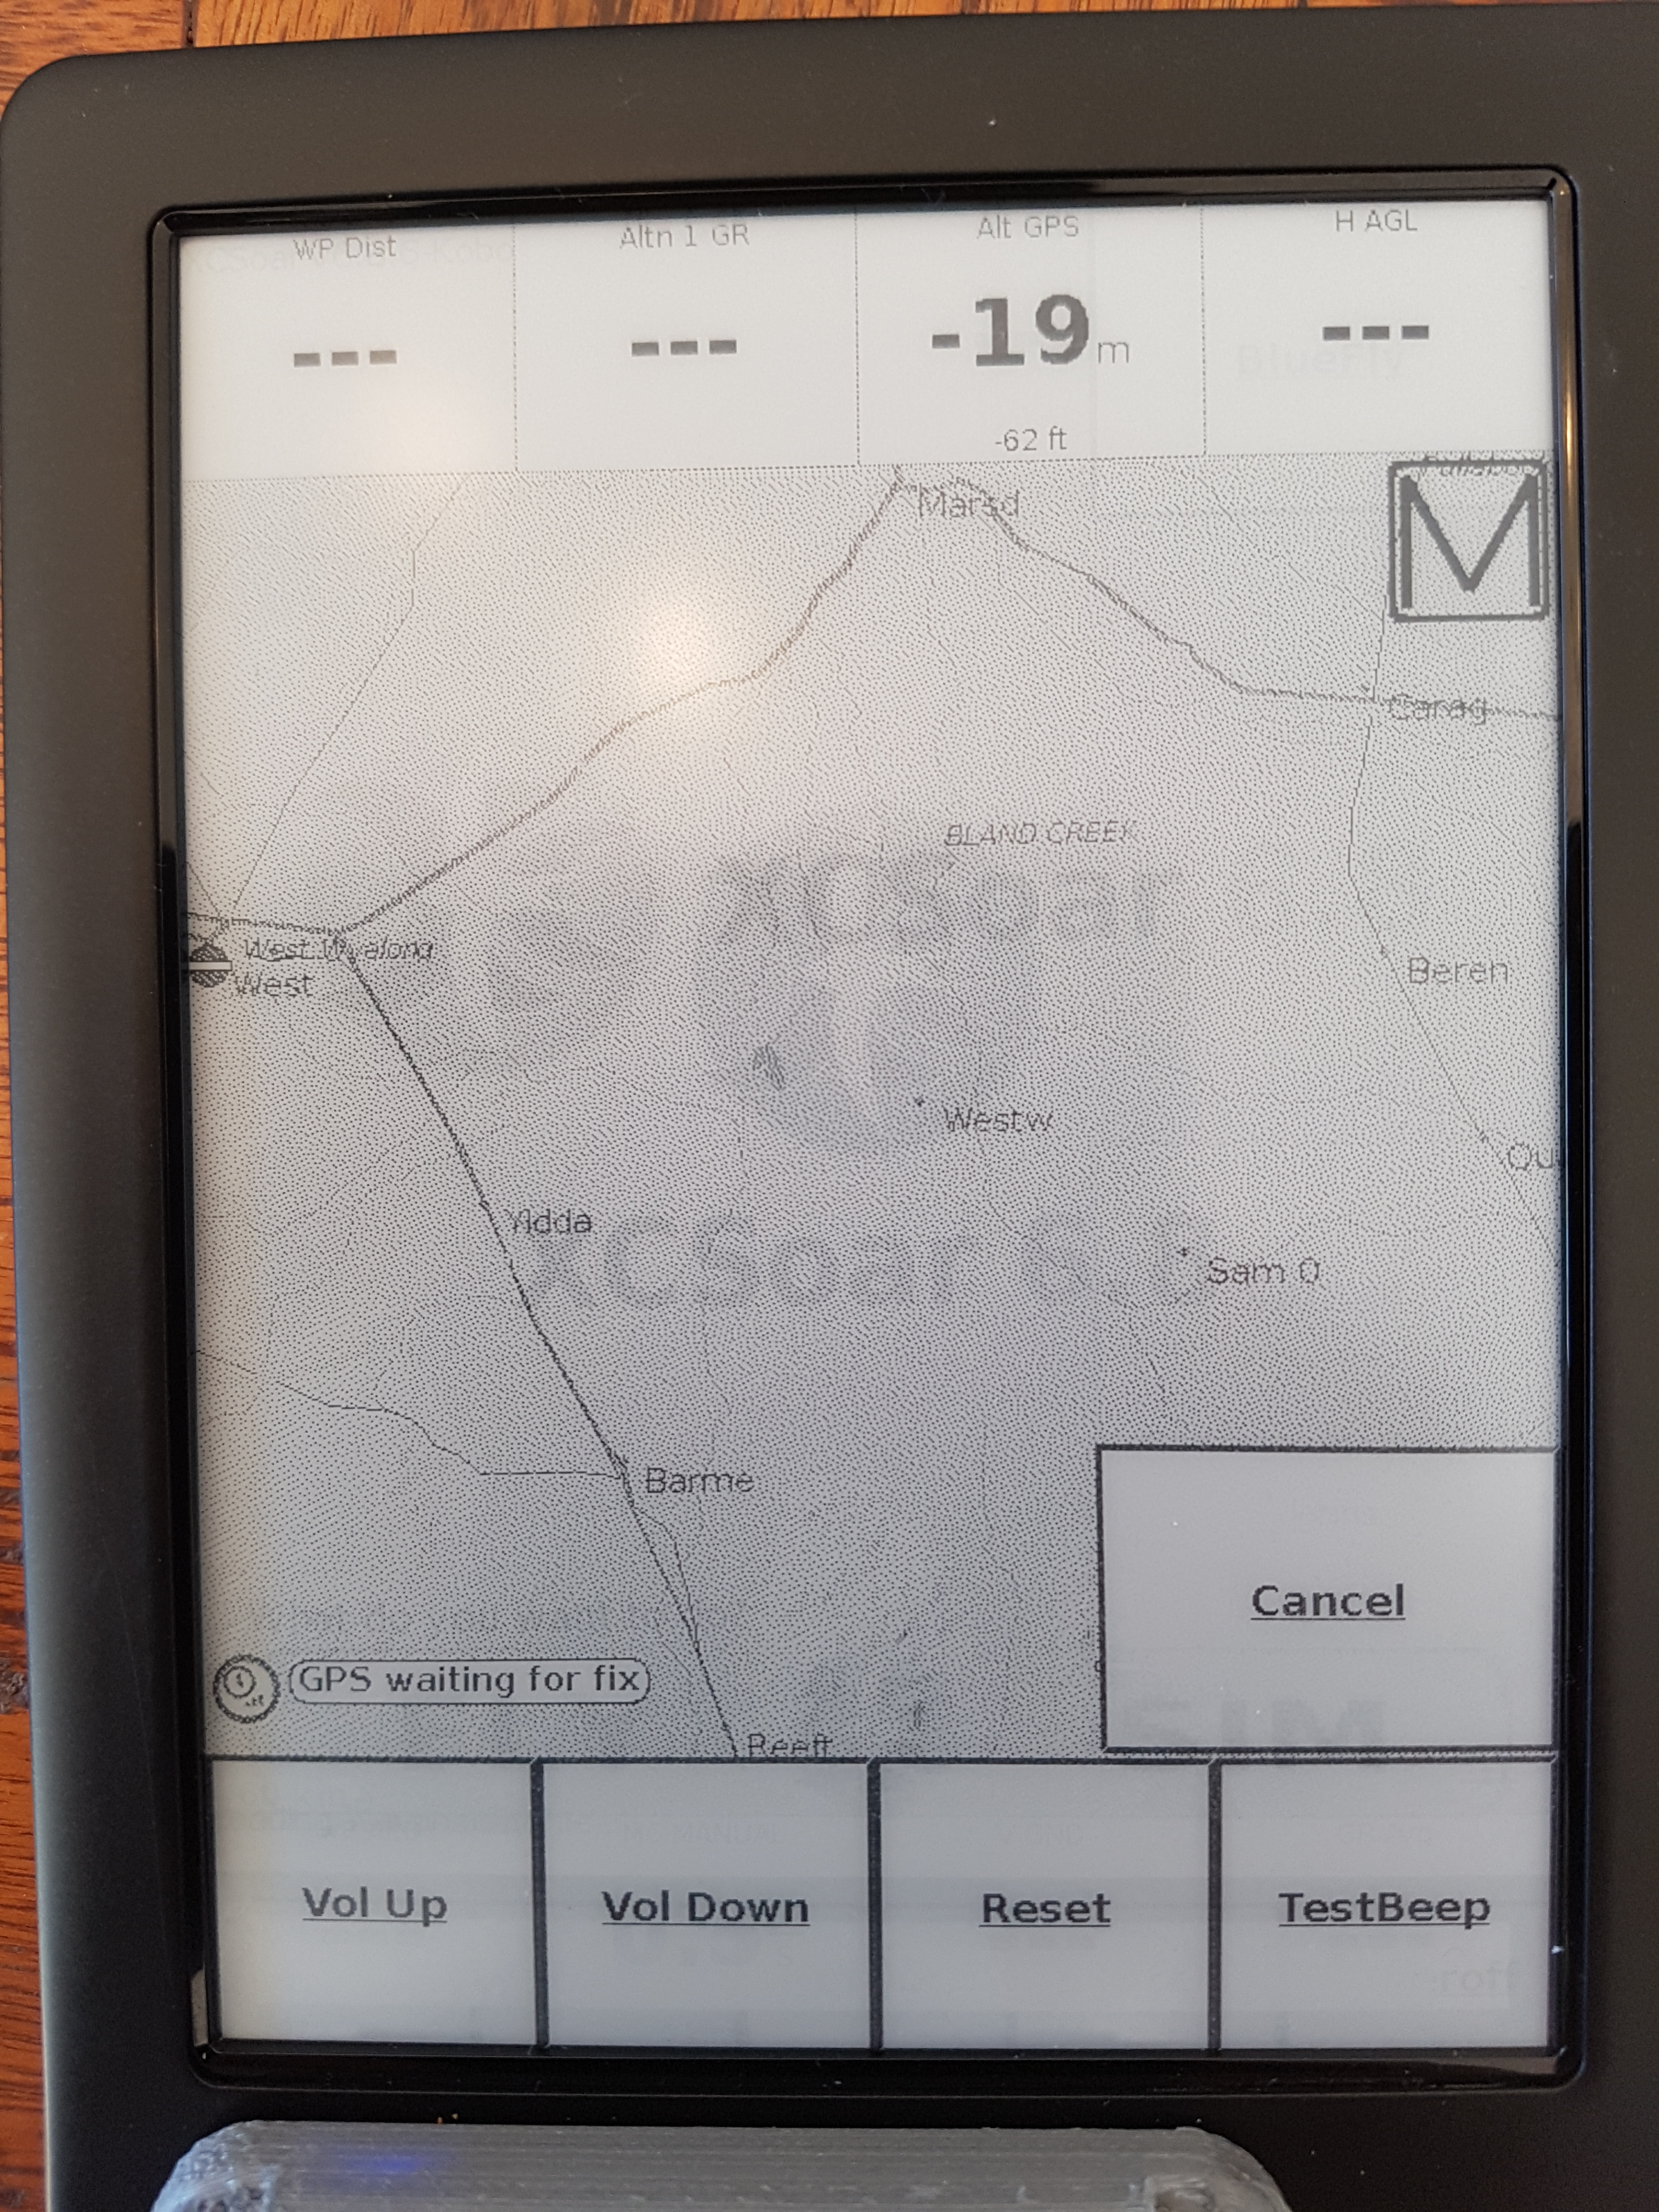
Software for the Kobo. You can download it here. That link has pictures and all the software to get the Kobo up and running with XCSoar 6.8.
There are detailed instructions you can follow here.
The reason for this post, is to compliment the above article with some pictures.
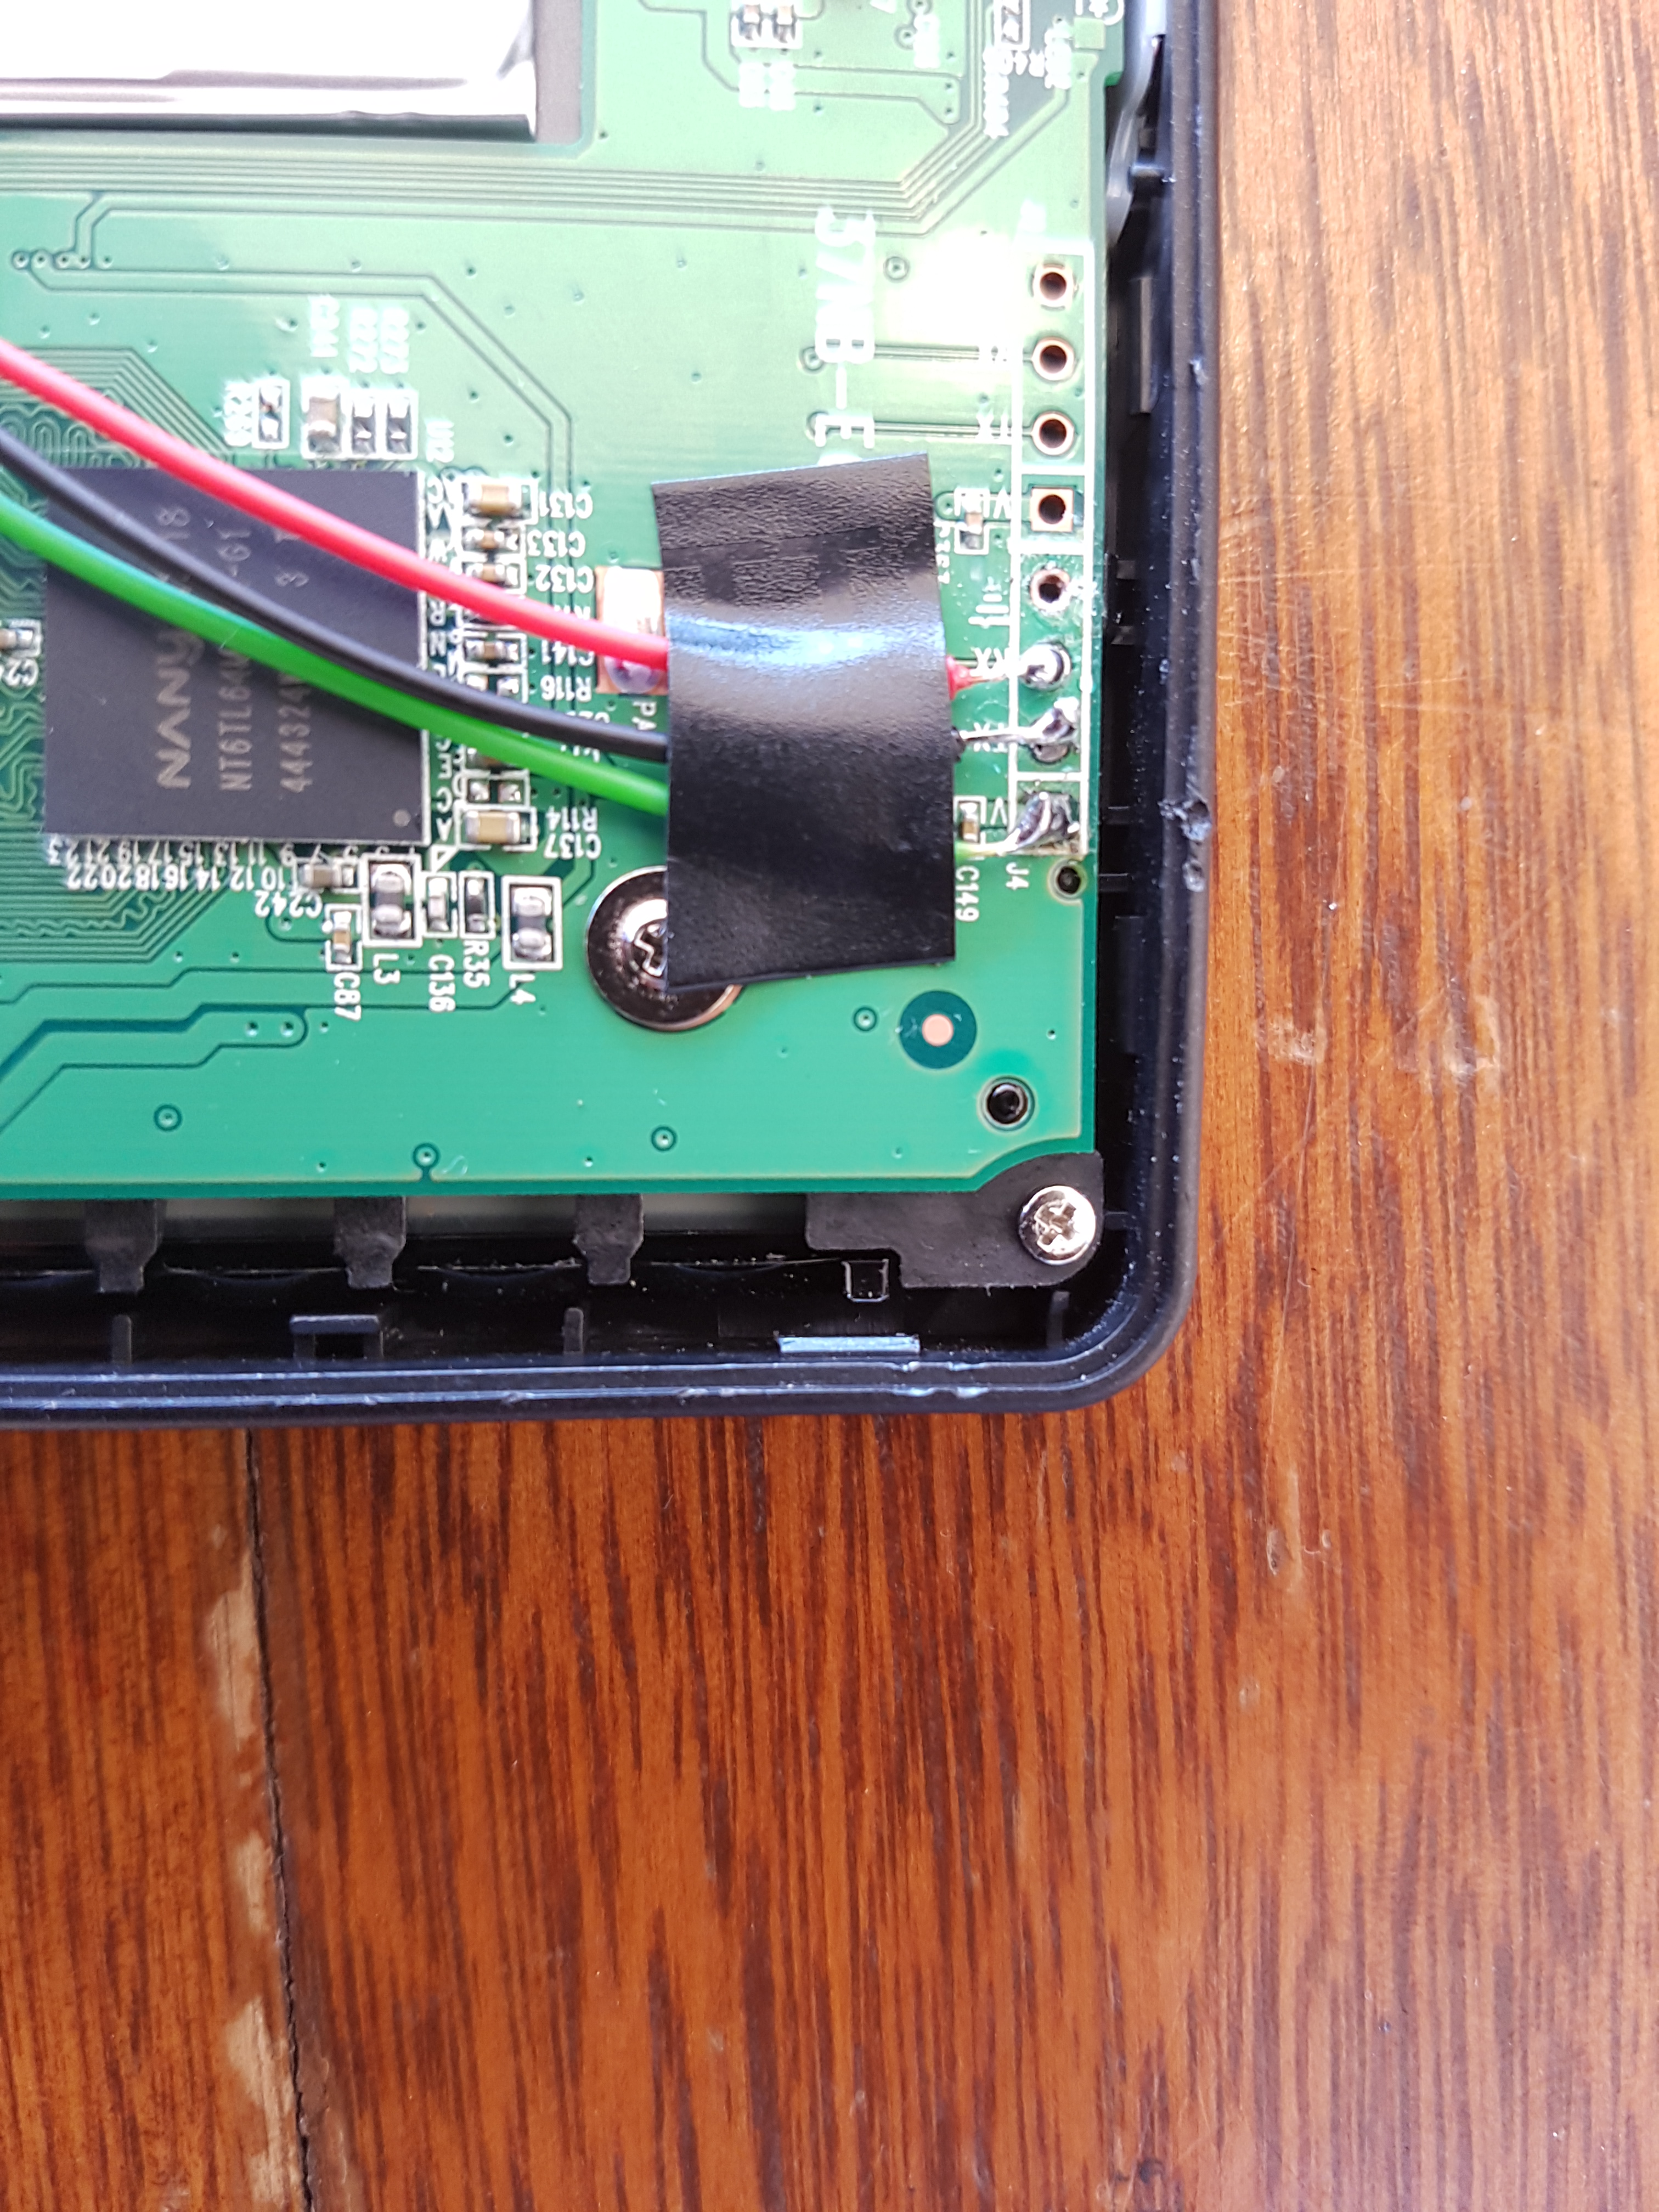
InventorySolder StationKobo Touch 2.0 Serial Port
Important: The RX on the Kobo Port goes to TX on the BlueFly. I use the screw to ground the circuit (yellow wire). Green Wire goes to V. Black and Red is TX and RX on Kobo and switched around on BlueFly.
Soldered To Kobo 2.0KoboRoot.tgz
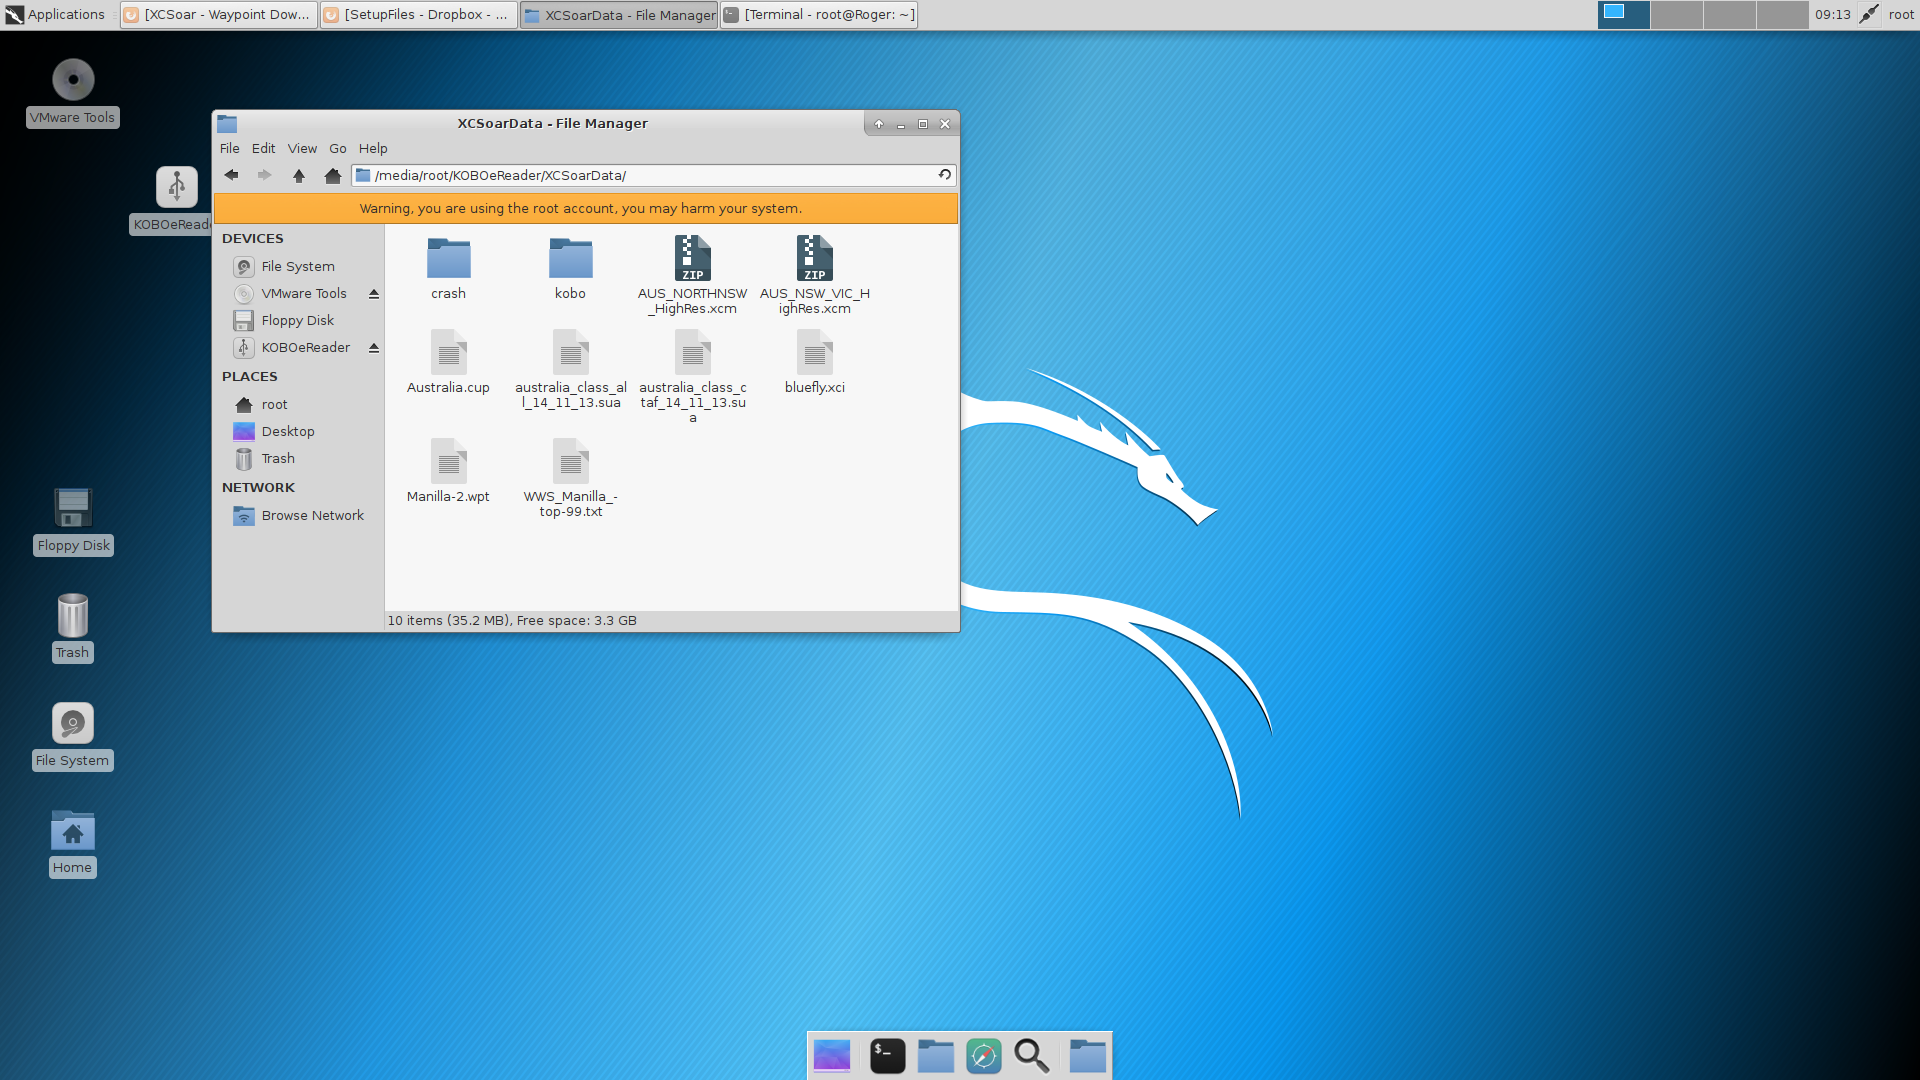
Use a Linux Operating System to copy KoboRoot.tgz to the hidden .kobo folder and then reboot the Kobo. I just take out the SD Card, plug it into a machine with Linux or on Windows with a Virtual Machine running Linux (I use Kali Distro).
Customise XCSoar
Once rebooted and XCSoar is running, go to Nickle and then plug in the Kobo 2.0, then just copy additional files for XCSoar. E.g. Maps, Waypoints
Device Settings
Make sure you go into XCSoar Config -> Devices and set the device settings for the BlueFly Vario. Once done, use the monitor button to check feedback. (Ensure the Vario is turned on, by pushing the button. It will make an annoying sound continuously.)…it was music to my ears.
Events – BlueFly.xci
In XCSoar, register the BlyeFly.xci file as an Event in Language/Input. Ensure advance mode is on. This gives you a cool menu for BlueFly where you can set the volume of the beautiful sound it makes.
bluefly.xci
Go outside, and test your new navigation tool to compliment your flight deck. Happy flying with loads of battery time 🙂
Tips:
I made two holes on the bottom side of the Kobo, to get the 3mm Nuts in, so I could bolt down the cover. Maybe you can get it working with 2mm bolts and nuts….
Only remove the Circuit Board screws. Do not remove the screws that hold the screen in. Leave the screen in the device during the entire modification process. Keep all wires above the circuit board, else the screen will not function correctly as it relies on a certain amount of pressure around the perimeter of the device. Look carefully under the circuit board, you will see lots of connectors around it. I initially tried to solder from under the circuit board (Easier to solder), but this cause a lot of issues with the screen touch sensitivity.
Nickly and the E-Reader still work after the modifications. If yours does not. Restore the SD card from a backup you made and go through the software modification again. e.g. 1. Copy the koboroot file to .kobo -> Reboot -> Customise XCSoar -> Nickel should work again.
if you ever reset the device with a long press on the power button, it may break Nickel and you can only use XCSoar without the e-reader. The symptom is Nickel will show a black screen.
varjw=newJw(ApiKey,ApiSecret);varparameters=newDictionary<string,string>{{"video_key","QxbbRMMP"},{"title","Test Updated"},{"tags","foo, bar, updated"},};varresult=jw.UpdateVideo(parameters);
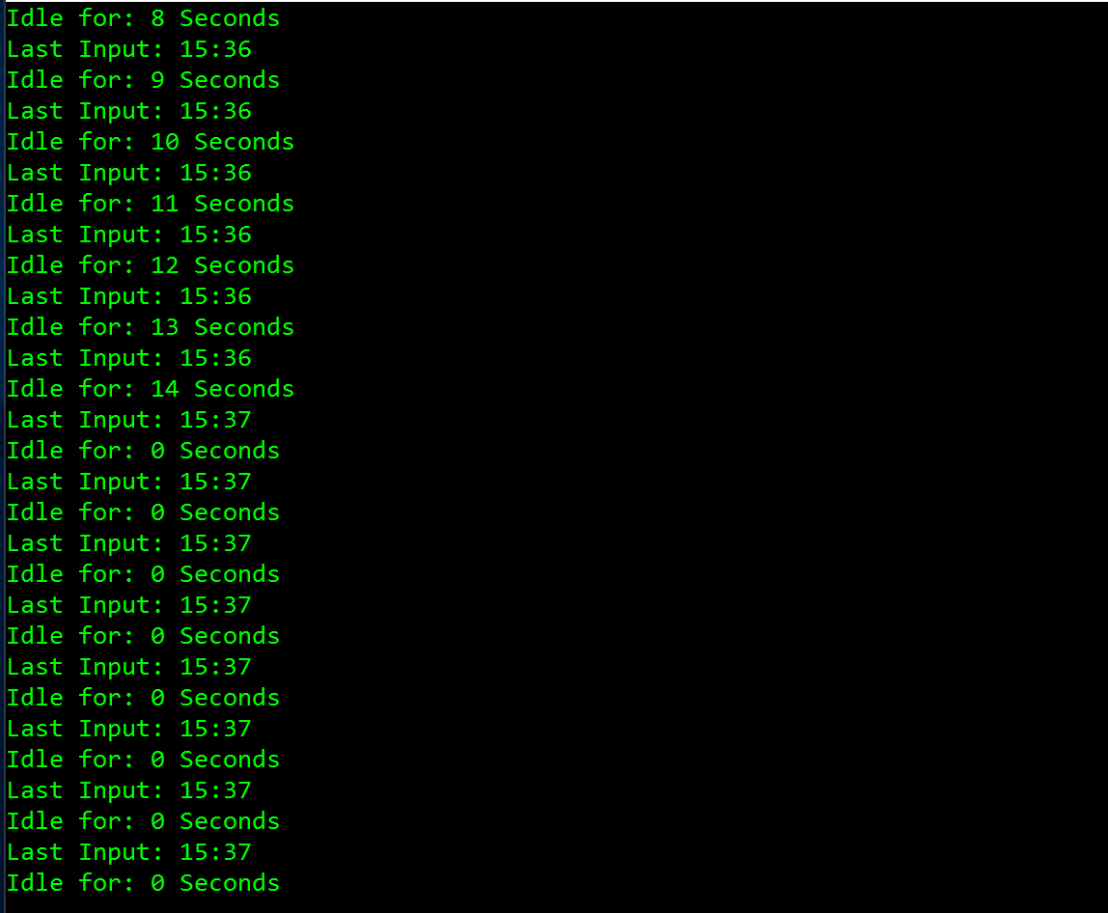
You are running a Windows Forms application that runs as a System Tray. You have a few notifications that you would like to show the user.
However, what good is notifications, if the user is on the Loo? She will not see them.
Solution
Run a timer that detects when the user is active on the machine, and then show the notification or other task you would like to provide.
Below is the sample code that will do this for you. Of course for your production environment you would use a timer of some sort or event subscription service.
I have tested this by using other applications whilst the program monitors my input and it is safe to say it works across all my applications, even when the screen is locked.
So you might want to deal with an issue where the screen is locked but the user is moving the mouse. However such an issue is an edge case that is unlikely to happen.
I know the MSDN mentions that GetLastInputInfo is not system wide, however on my Windows 10 machine, it does seem to be the case that it is system wide.
using System;
using System.Runtime.InteropServices;
using System.Timers;

namespace MyMonitor
{
    class Program
    {
        private static Timer _userActivityTimer;
        static void Main()
        {
            _userActivityTimer = new Timer(500);
            _userActivityTimer.Elapsed += OnTimerElapsed;
            _userActivityTimer.AutoReset = true;
            _userActivityTimer.Enabled = true;
            Console.WriteLine("Press the Enter key to exit the program at any time... ");
            Console.ReadLine();
        }

        private static void OnTimerElapsed(object sender, ElapsedEventArgs e)
        {
            Console.WriteLine($"Last Input: {LastInput.ToShortTimeString()}");
            Console.WriteLine($"Idle for: {IdleTime.Seconds} Seconds");
        }

        [DllImport("user32.dll", SetLastError = false)]
        private static extern bool GetLastInputInfo(ref Lastinputinfo plii);
        private static readonly DateTime SystemStartup = DateTime.Now.AddMilliseconds(-Environment.TickCount);

        [StructLayout(LayoutKind.Sequential)]
        private struct Lastinputinfo
        {
            public uint cbSize;
            public readonly int dwTime;
        }

        public static DateTime LastInput => SystemStartup.AddMilliseconds(LastInputTicks);

        public static TimeSpan IdleTime => DateTime.Now.Subtract(LastInput);

        private static int LastInputTicks
        {
            get
            {
                var lii = new Lastinputinfo {cbSize = (uint) Marshal.SizeOf(typeof(Lastinputinfo))};
                GetLastInputInfo(ref lii);
                return lii.dwTime;
            }
        }
    }
}
Bootcamp with Windows on one partition and OSX on another.
A great way to manage your Windows Azure environment is to use a Docker Container, instead of powershell.
If you are new to automating your infrastructure and code, then this will be a great way to start on the right foot from day one.
Docker is an open platform for developing, shipping, and running applications. Docker enables you to separate your applications from your infrastructure so you can deliver software quickly. With Docker, you can manage your infrastructure in the same ways you manage your applications. By taking advantage of Docker’s methodologies for shipping, testing, and deploying code quickly, you can significantly reduce the delay between writing code and running it in production.
After Installing Docker
1. Use bootcamp to boot back into OSX.
2. In OSX restart the machine (warm restart)
3. Hold the Options key down to boot back into Windows
The above looks like a waste of time, However, this will enable Virtualisation in the Bios of the Macbook, since OSX does this by default and windows will not. So it is a small hack to get virtualisation working via a warm reboot from OSX back to Windows.
Grab a Docker Virtual Image with Azure CLI
Run the following command:
docker run -it microsoft/azure-cli
The above command will connect to the Docker Repository and download the image to run in a container. This is basically a virtualized environment where you can now manage your windows environment from.
Install Azure Command Line Interface (CLI)
Run the following command:
Azure Help
Look carefully at the image below. Powershell was used to run Docker. However once I run Docker, look at my prompt (root@a28193f1320d:/#). We are now in a Linux virtual machine (a28193f1320d) and we now have total control over our Azure resources from the command line.
Docker in Windows
Now, the Linux guys will start having some respect for us Windows guys. We are now entering an age where we need to be agnostic to technology.
Below we are now running a full blown Kernel of Linux in a Windows Powerhsell prompt.
What is even cooler, we are using a Linux VM to manage the Azure environment, and so we get awesome tools for free.
Good Habits
By using docker with the Azure Command Line interface, you will put yourself into a good position by automating all your infrastructure and code requirements.
You will be using the portal less and less to manage and deploy your azure resources such as Virtual Machines, Blobs and Permissions.
Note, we are now using ARM – Azure Resource Management, some features in ARM will not be compatible with older Azure deployments. Read more about ARM.
Conclusion
You can deploy, update, or delete all the resources for your solution in a single, coordinated operation. You use a template for deployment and that template can work for different environments such as testing, staging, and production. Resource Manager provides security, auditing, and tagging features to help you manage your resources after deployment.
CLI Reference
help: Commands:
help: account Commands to manage your account information and publish settings
help: acs Commands to manage your container service.
help: ad Commands to display Active Directory objects
help: appserviceplan Commands to manage your Azure appserviceplans
help: availset Commands to manage your availability sets.
help: batch Commands to manage your Batch objects
help: cdn Commands to manage Azure Content Delivery Network (CDN)
help: config Commands to manage your local settings
help: datalake Commands to manage your Data Lake objects
help: feature Commands to manage your features
help: group Commands to manage your resource groups
help: hdinsight Commands to manage HDInsight clusters and jobs
help: insights Commands related to monitoring Insights (events, alert rules, autoscale settings, metrics)
help: iothub Commands to manage your Azure IoT hubs
help: keyvault Commands to manage key vault instances in the Azure Key Vault service
help: lab Commands to manage your DevTest Labs
help: location Commands to get the available locations
help: network Commands to manage network resources
help: policy Commands to manage your policies on ARM Resources.
help: powerbi Commands to manage your Azure Power BI Embedded Workspace Collections
help: provider Commands to manage resource provider registrations
help: quotas Command to view your aggregated Azure quotas
help: rediscache Commands to manage your Azure Redis Cache(s)
help: resource Commands to manage your resources
help: role Commands to manage role definitions
help: servermanagement Commands to manage Azure Server Managment resources
help: storage Commands to manage your Storage objects
help: tag Commands to manage your resource manager tags
help: usage Command to view your aggregated Azure usage data
help: vm Commands to manage your virtual machines
help: vmss Commands to manage your virtual machine scale sets.
help: vmssvm Commands to manage your virtual machine scale set vm.
help: webapp Commands to manage your Azure webapps
help:
help: Options:
help: -h, --help output usage information
help: -v, --version output the application version
help:
help: Current Mode: arm (Azure Resource Management)


You must be logged in to post a comment.